 Tweet
Tweet
Sorry for the dumb question but what is the goal? To get the level so its flat across the hole boat, each sponson, or some combo of?
-
-
Looks good Maxmekker. Just start adding filler to fill in the low spots and get them flat all the way across. Then get the inside and back edges crisp and sharp.
d.a.v.e here is a quote from Darin Jordan about what doing this to the miss geico will help with.
Darin:
"Cleaning up the bottom makes the boat run more efficiently. It allows the water to cleanly break off the wetted surfaces. Cleaning up the inside of the sponsons and making them sharp enhances the cornering and getting rid of the recesses in the sponson bottoms gets rid of "suction cups" on the ride pads... making them run more consistently and faster."
This thread shows more info here about this
Darin had a hand in doing the miss gecio and a few other of the proboat models and he races. So I I have enjoyed his input on things for this boat. I dont race anyone (as I dont know anyone who boats around here and there are no races in my area) in mine but I am chasing speed and the faster you make something go the more critical things being perfect and true become. My frst MG wasnt all that bad but I did it just to do it. This 2nd MG the bottom of the hull had really bad concave spots in the middle of the sponsons. Not so good for me trying to make it go fast lol.Land, Sea & Air, A true RC Addict.Comment
-
will start tomorrow. I have the presto easy filler. from the box:
A two-component polyester that provides a dense and pore-free surface that provides a perfect base for further painting.
I hate the mixing of the hardner, don't want to mess it up. Will do a test first.Drammen rock CityComment
-
if you are going to the bother of blue printing the hull i would say do it right, so yes i think you need to sand the pads down a little bit more then you can see where to build up the hollows, also make sure that all the ride pads are the same hieght one of the middle pads on mine was way lower than the rest and had to build it up, also had to take hooks out of the rear ride pads too, while you are doing the pads i would sharpen the inside and outside edges of the sponsons as well, after that just make sure all edges are 90deg and sharp this make a great difference takes a little patients but well worth it in the end. When i had finished doing mine i set the strut level with the bottom of the sponsons and slapped a m445 with a leo 4074 on a t180 set at 11.25 deg timing and it runs great hits mid fifties no proplem corners hard and fast. One other thing i would change out the standard flex for a 187 flex and use a octura coupler, i ripped two 150 flex cables to bits with the leo 4074 m445 comboSocal Fe member, miss gieco castle 1515 1y t-180, blackjack29 stock,insane FE30 p sport castle 1515 1y t-180, insane FE30 p spec ul-1 motor t-120, insane 34"mono neu 1521 1.5d t-180Comment
-
thanks for the tip's. will post some shots later. My kintec flex is holding up good with the leo/m445. But The stock did wear rather fast.
JPriami :
Hope you don't mind the chitt chatt in you're tread.Drammen rock CityComment
-
Threads not hijacked your taking about your MG's and sharing useful info & tips. Good stuff
I have the OSE upgraded cable and a couple wire drives I'm trying. Also still have 2 stock cables.Land, Sea & Air, A true RC Addict.Comment
-
Sorry maybe my question was not real clear.. I understand the reasons for doing it but don't really understand what to do. Is the goal to even out all of the rid pads so they are level with each other or is there a pattern where different sets need to be different heights? Watching my boat run I would guess I would need to focus on the back two ride pads on each side.. maybe even just the one furthest at the back.
So if I'm looking at it from that point of view do I want the two on each side level with each other? Should it be level going both long ways and width wise across the bottom of the boat and show level?
Would you happen to know of a link that might explain the process and products needed so a new guy can understand it, better then this thread?Comment
-
Today was freaking awesome. Boat runs totally like it should now! I was able to pull 62.1mph off the Gps and temps below 120. But I was so happy to see the boat running across the water smoothly and fast. Constant roster tail no chopping from a bounce. Craziest thing was I played around with battery placement and I was able to move the batteries really far back like 1.5 inches away from back of sponson ends and it still stayed smooth. Made it gain speed but a little loose for a corner was the trade off.
Had about the people stop and watch today. It was good times.Land, Sea & Air, A true RC Addict.Comment
-
That's how it should be. Post some shot's of placement when you get the time. What prop/lipo motor combo ?
when doing the hull, what type of 'stuff' did you use. auto store type, witch has to be mixed, ore ready to go from bottle? I tried to mix up a test now a couple of houers ago, not sure I got it right. Will do the hull tomorrow.Drammen rock CityComment
-
GREAT!!! I am in process of bluebrinting the bottom of my MG right now. I cant wait....Miss Geico CC1515 2200kv T180 2S2S- Twin Genesis with 2 2700kv 2 T180's 4S2P- Stiletto with 2030kv T120 4S1P-DF33 4082 1600kv T180 6S2P- and lots of gassers!Comment
-
D.a.v.e -
Get the ride pads level with each other long ways on each side. They are not the stepped one higher than the other on these hulls.Land, Sea & Air, A true RC Addict.Comment
-
Getting a little better each day. 63.8Mph
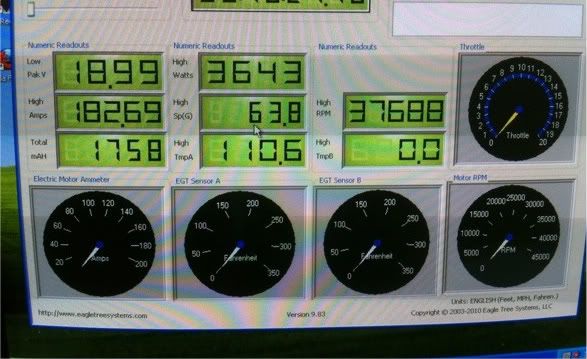
its odd temp B wont show up on a downloaded from device log. But shows up in live mode and on the power panel lcd.Land, Sea & Air, A true RC Addict.Comment
-
Short clip from earlier today 8.12.11
Boat ran pretty good. Slight bounce was back at certain lower speeds. I was playing around with battery placement and think thats why.
 Land, Sea & Air, A true RC Addict.
Comment
-
Lol copy you? No I had my CC 1520 & the 1518 when I bought my first MG I had a plan all along. Just had to smash a hull first, then get back to it.
BTW thats my 2yr old son getting a kick out of watching the boat. I look forward to doing RC with him in the future.Land, Sea & Air, A true RC Addict.Comment

Comment