Darin's 25" Radtek Mystic N2 Build

Collapse
X
 
  • Time
  • Show
Clear All
new posts
  • Darin Jordan
    Fast Electric Addict!
    • Apr 2007
    • 8335

    #1

    Darin's 25" Radtek Mystic N2 Build

    I decided to document this build, since it's been awhile since I've publicized one.

    I picked up this Keith Bradley Boats Radtek 25" Carbon Mystic a bit ago for the purposes of building a SAW Cat to play with. What can I say... small boats travel well!

    The plan is to set this up for the N2 class SAW racing. 1 motor, 2S1P, and a whole lot of tuning.

    I asked that this boat be laid up "light but strong". It can VERY well laid up, and very strong. Not the lightest boat, however. I don't think it's too bad, and it will definitely survive the abuse it's going to get.

    Fitting a single motor in this thing is going to be a challenge. I've decided to make a dropped down "engine well" to allow the motor to fit under the hatch. I'm building a plug for a mold so I can form the well from vacuum bagged carbon. More on that later.

    While getting that ready, I have fitted a rudder and fabbed and fitted a strut assembly.

    Rudder is this OSE part number: http://www.offshoreelectrics.com/pro...prod=ose-80055


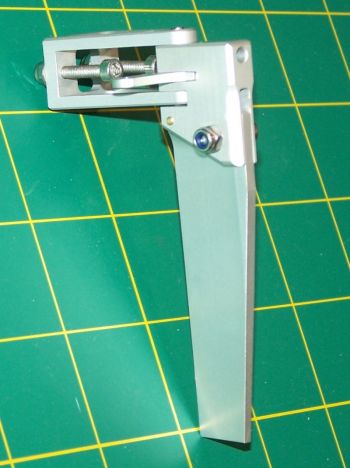
    It's a little long, but otherwise about the right size for what I need to do. I'll be shortening this blade quite a bit, and will likely eventually replace it with a stainless knife blade. We'll see how this holds up. Offset is to the left to help counter prop-walk and hopefully help to control the boat at speed.

    The carbon strut blade material was made for me by Brian Buaas. Nice stuff. Very rigid. Super light. I'll be running a 1/8" stubshaft on 1/16th inch wiredrive, so the strut will employ the bearings in each end. More on that later as well.

    Because of the very tight mounting spaces on this boat, using backing nuts, or nut-plates, was not an option. There isn't a flat surface inside the transom for them to seat properly against. To allow for a solid mounting, I cut a couple of short pieces (about 1" and 1 1/4") of 5/16" aluminum rod, and epoxied them inside the transom at the mounting points. Once the epoxy had set, I drilled and tapped through the transom with a 4-40 tap, and mounted the hardware with 4-40 stainless socket head screws.

    On the rudder, I'm not sure what the original size of the pivot is, but it's likely metric, and definitely not "SAW" level "tight". It's a little sloppy, in other words. To remedy this, I used a 0.125" (1/8") reamer to size the brass bushings and the rudder pivot hole in the rudder, and will be cut a 1/8" stainless axle rod to fit. This will provide a much tighter and more precise fit. Don't need rudder slop at 70+mph.
    Attached Files
    Last edited by Darin Jordan; 11-18-2014, 12:01 PM.
    Darin E. Jordan - Renton, WA
    "Self-proclaimed skill-less leader in the hobby."
  • Shooter
    Team Mojo
    • Jun 2009
    • 2558

    #2
    Cool. One of these days I want to build up a cat. Will be watching this one. So, regarding prop walk.... the prop (CC rotation when looked at from the rear) will cause the transom to move to the to the left (paddle wheel effect), thus the boat wanting to turn right, right? So, the left mount rudder counteracts this by creating a torque about the CG equal to the water force hitting the rudder multiplied by the distance (moment arm) from the center line of the hull?

    If this is true, a rudder on the 'right' (although not effective at counter acting prop walk), would be 'more effective' at turning right? Right? Since the torque would be helping it turn to the right?? I'm just curious because I've had rudders on each side and it's always been a debate. Thanks. ....and yes, I've had too much to drink tonight.

    Comment

    • keithbradley
      Fast Electric Addict!
      • Jul 2010
      • 3663

      #3
      Very cool Darin. Looking forward to following along.
      www.keithbradleyboats.com

      Comment

      • Darin Jordan
        Fast Electric Addict!
        • Apr 2007
        • 8335

        #4
        Funny that rudder placement was questioned. I questioned it as well. After consulting with another expert I decided to follow my original thoughts and place the rudder on the right. A little more work, but it's the end result that matters.

        Kind of messed up the transom some with all the drilling so some bodywork will be necessary. But what would a boat build be without some filling and sanding?

        Have the rudder remounted on the right and the steering system setting up.

        Using a Spektrum A 7020 Digital high - torque wing servo that is mounted in place on a phenolic base.

        Steering rod is running through a .410 sized piece of X11 fiberglass tubing from Goodwinds Kites. I will put the seal on the inside end.
        Attached Files
        Last edited by Darin Jordan; 02-25-2014, 09:23 AM.
        Darin E. Jordan - Renton, WA
        "Self-proclaimed skill-less leader in the hobby."

        Comment

        • Darin Jordan
          Fast Electric Addict!
          • Apr 2007
          • 8335

          #5
          One more thing I accomplished last night, aside from turning the transom into Swiss Cheese, was to modify the rudder assembly to increase it's precision.

          The pivot pin is pretty loose on these, so I used a .125 reamer to open up the pivots, and then fabbed a stainless .125" axle-shaft pin. I am leaving the pin about 3/16" longer than it needs to be so it's easier to get in and out of the pivot.

          The steering arm on these rudders is loose as well. It just floats on the pivot pin. I installed a set-screw underneath the blade holder in order to set the steering arm in place. This removed the slop in the steering.

          I also added an addition 4-40 set screw on the face of the blade holder and opened up the existing set screw at the back of the blade holder to better secure the pivot pin.

          One thing I recommend is that you do NOT use the stainless set screws. They look better, and make more sense from a corrosion standpoint, but they tend to be soft and will certainly round out inside if you try to torque them down to the point where they are actually doing what you want them to. The "black" set screws are harder and more reliable, and will be less hassle down the road. Don't like the little bit of surface rust that shows up? A black sharpie will take care of that!
          Attached Files
          Last edited by Darin Jordan; 02-25-2014, 09:44 AM.
          Darin E. Jordan - Renton, WA
          "Self-proclaimed skill-less leader in the hobby."

          Comment

          • Shooter
            Team Mojo
            • Jun 2009
            • 2558

            #6
            Good call on the black hardened set screws. SS is no doubt softer.

            Comment

            • Darin Jordan
              Fast Electric Addict!
              • Apr 2007
              • 8335

              #7
              Originally posted by Shooter
              Good call on the black hardened set screws. SS is no doubt softer.
              Yeah... found that out the hard way one too many times.

              Should probably note that, because this is a SAW setup, I will likely end up replacing the rudder assembly with something harder at some point. Wanted to see how it held up first. The blade, at a minimum, will be fabbed from a knife blade, once I determine what's needed.

              For now, I just shortened this rudder about 1/2" to make it a little more reasonable.
              Darin E. Jordan - Renton, WA
              "Self-proclaimed skill-less leader in the hobby."

              Comment

              • keithbradley
                Fast Electric Addict!
                • Jul 2010
                • 3663

                #8
                Stainless is much harder than typical steel, you'll find that out if you ever have to cut/drill/etc.
                The problem with stainless is that they have almost no carbon content whatsoever, which makes it impossible to heat strengthen them, making them inferior to hardened steel hardware.
                If you already know that, cool. I didn't connect the dots for a long time, so I figured I'd share for those who don't know.

                What size flex are you running Darin?
                Also, I know you're more than likely going to keep the motor choice to yourself, but have you figured out what you are running for ESC? Not a lot of room in there...
                www.keithbradleyboats.com

                Comment

                • Darin Jordan
                  Fast Electric Addict!
                  • Apr 2007
                  • 8335

                  #9
                  Knife blades make great SAW rudders.

                  I haven't fully worked out the power system, but the ESC will be a Castle ICE Lite 200 with water cooling.
                  Darin E. Jordan - Renton, WA
                  "Self-proclaimed skill-less leader in the hobby."

                  Comment

                  • Darin Jordan
                    Fast Electric Addict!
                    • Apr 2007
                    • 8335

                    #10
                    Not running flex... 1/16th wire drive.
                    Darin E. Jordan - Renton, WA
                    "Self-proclaimed skill-less leader in the hobby."

                    Comment

                    • Darin Jordan
                      Fast Electric Addict!
                      • Apr 2007
                      • 8335

                      #11
                      Got a little more done last night.

                      Fixed up the damage/holes in the transom using epoxy mixed with milled-fiber and fumed Silica, then touched up with some spot-filler.

                      You can see the carbon tube in the transom where the steering linkage will reside. I'll put the seal on the inside.

                      Here is a pic, also, of the plug I'm making to create a mold for the belly-pan section. This will allow for clearance to lower the motor into the tunnel a bit, which will enable me to actually put a motor in the center of this boat. It's very "short", so there simply isn't much room for a motor under the hatch, especially as far forward as it needs to go. Cats really weren't designed with the idea of "singles" in mind. I actually wish that N2 CAT would allow twins like the rest of the Cat classes, but we have what we have.

                      The coupler will be accommodated in that belly pan as well. Hopefully this will allow me to put a nice, smoothly bent drive-line in the boat.

                      Plug has two coats of epoxy on it and I just need to do the finish sanding on it and then spray in mold primer. Then I can start producing the part.
                      Attached Files
                      Darin E. Jordan - Renton, WA
                      "Self-proclaimed skill-less leader in the hobby."

                      Comment

                      • NativePaul
                        Greased Weasel
                        • Feb 2008
                        • 2760

                        #12
                        Why the switch to the rudder on the right Darin?
                        Paul Upton-Taylor, Greased Weasel Racing.

                        Comment

                        • Darin Jordan
                          Fast Electric Addict!
                          • Apr 2007
                          • 8335

                          #13
                          Originally posted by NativePaul
                          Why the switch to the rudder on the right Darin?
                          I have a theory on how the rudder on the right should help straighten the boat out through the SAW course, and I also have a theory that it may help to counter some of the torque roll by using the tendency for the prop to walk to leverage against the rudder and push down on the left sponson.

                          Plus, Mark Grim told me that every SAW Cat he has ever owned/built had the rudder on the right... That is enough right there.
                          Darin E. Jordan - Renton, WA
                          "Self-proclaimed skill-less leader in the hobby."

                          Comment

                          • electric
                            Fast Electric Addict!
                            • May 2008
                            • 1744

                            #14
                            Originally posted by Darin Jordan
                            I have a theory on how the rudder on the right should help straighten the boat out through the SAW course, and I also have a theory that it may help to counter some of the torque roll by using the tendency for the prop to walk to leverage against the rudder and push down on the left sponson.

                            Plus, Mark Grim told me that every SAW Cat he has ever owned/built had the rudder on the right... That is enough right there.
                            Good Theory...chuckle...I am with you on that theory..

                            Comment

                            • Darin Jordan
                              Fast Electric Addict!
                              • Apr 2007
                              • 8335

                              #15
                              Originally posted by electric
                              Good Theory...chuckle...I am with you on that theory..
                              I hope we are right!

                              Have the plug for the dropped motor well sanded out. I may try to primer it tonight, which could mean I'm pulling a mold from it before the end of the weekend. Nothing worth posting pics of... but another step.

                              Now I just have to wonder if lowering the motor down into the tunnel is going to disrupt the airflow in a good way, or a very bad way... One way to find out!
                              Darin E. Jordan - Renton, WA
                              "Self-proclaimed skill-less leader in the hobby."

                              Comment

                              Working...