R2 rigger rebuild

Collapse
X
 
  • Time
  • Show
Clear All
new posts
  • steamboatbob
    Member
    • Jan 2010
    • 51

    #1

    R2 rigger rebuild

    Hi guys

    (note to admins im just rebuilding this rigger and posting a few photos to show how i did it as i know lots of people out there got one of these and this is what i did so if you ant to move this post or deleete it feel free)

    I just want to let people know what they are in for

    cheers

    bob

    ok after a few weeks now of running my R2 hobbies rigger i am starting to see water in the hull and quite frankly i am really unhappy with a few things in the boat (sponson tube positions, people giving outrageous statements of what speed their boat has done, lack of room and flimsy build quality.)


    essentially i am going to run a leopard 4074 2150 KV motor turnigy 180 esc and run it on 14 V if it kills me or i spend way too much it will be a learning experience for myself.

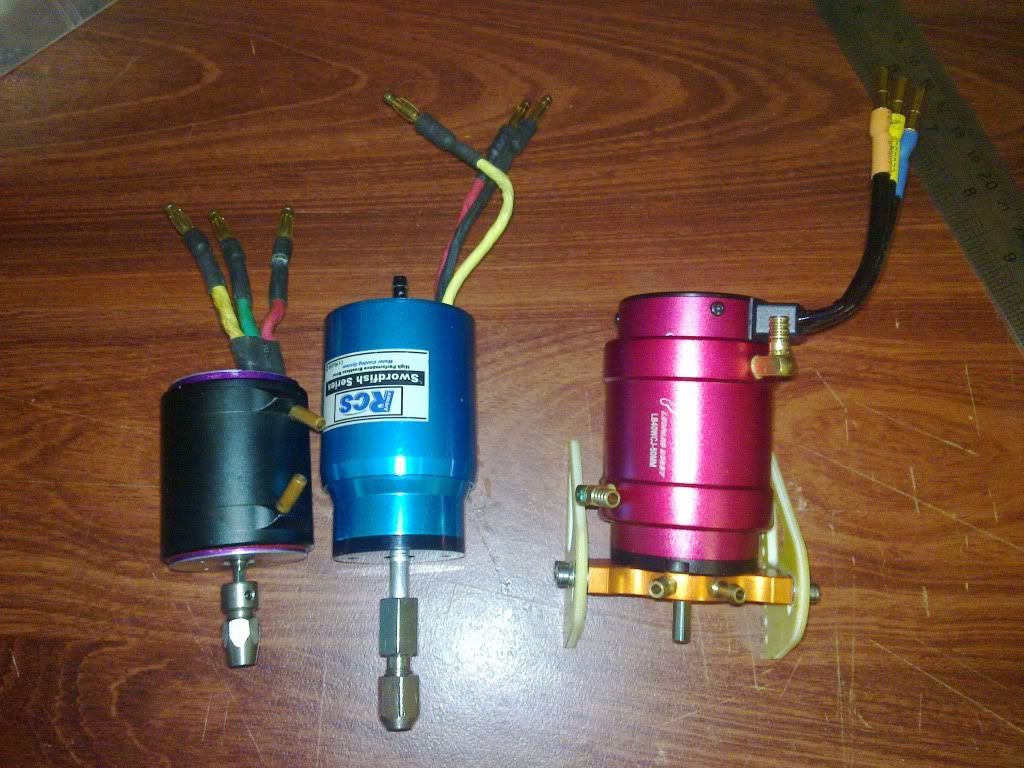
    to start with i have here a pic of the motors i have the small feiago and the swordfish motor have been tested but they both really lack the punch that i need.
    i only ran the blue swordfish once and my coupler that was supplied with the kit busted a pooper valve and refused to grab the cable. first problem, then the second problem was noticed water was inside the rear sponsons so i had a leak


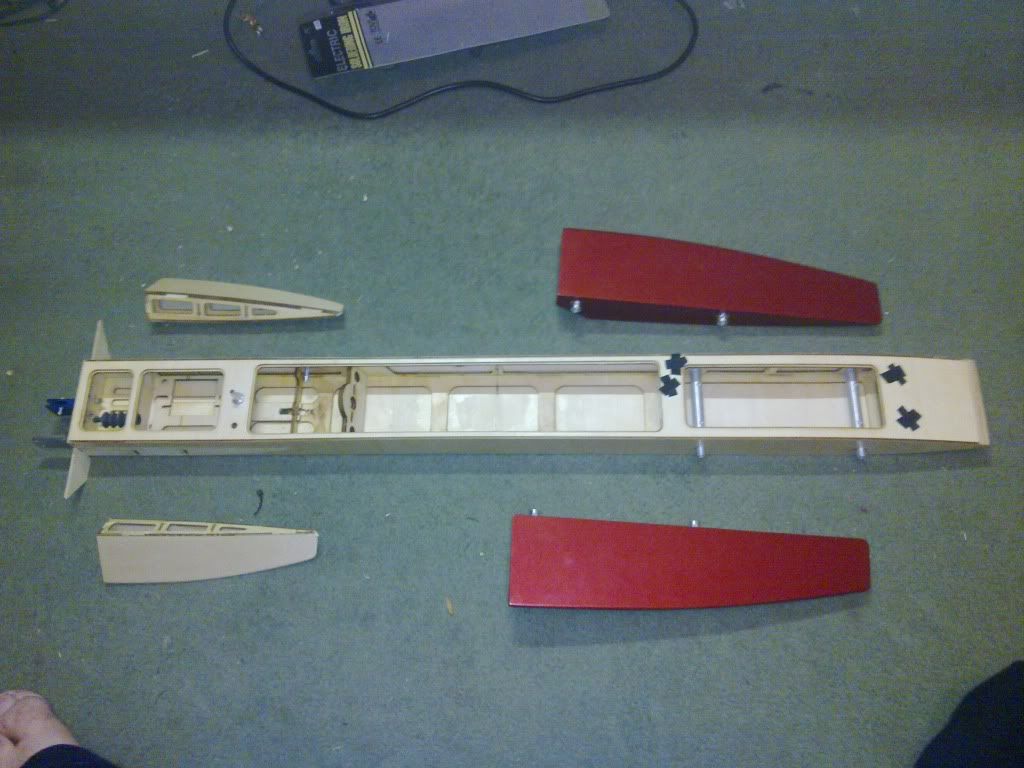
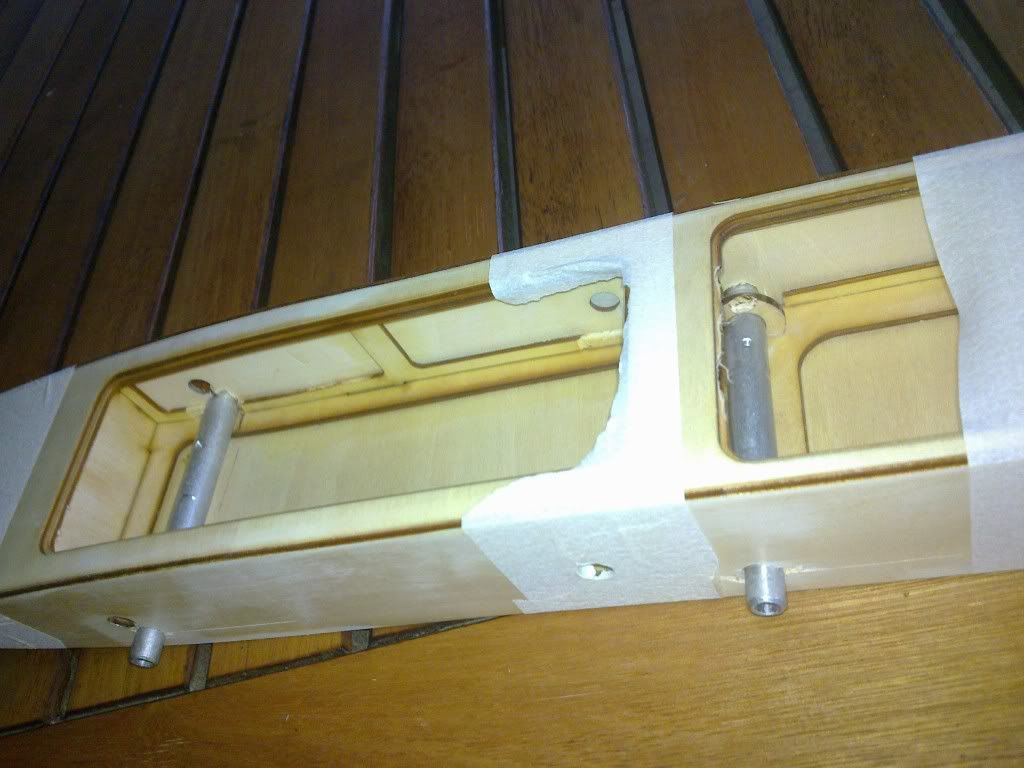
    this is what i have done this morning first taken of the rear sponsons and please note i have not used any cutting tool at all to do this so this is how POOR the glue they have used is, i just used my fingers to push the pieces apart. the glue cracks easily and pulls apart.


    i decided to pull the sides of the tub off this was easily done by using a thin wedge rudder and gently pushing down like this


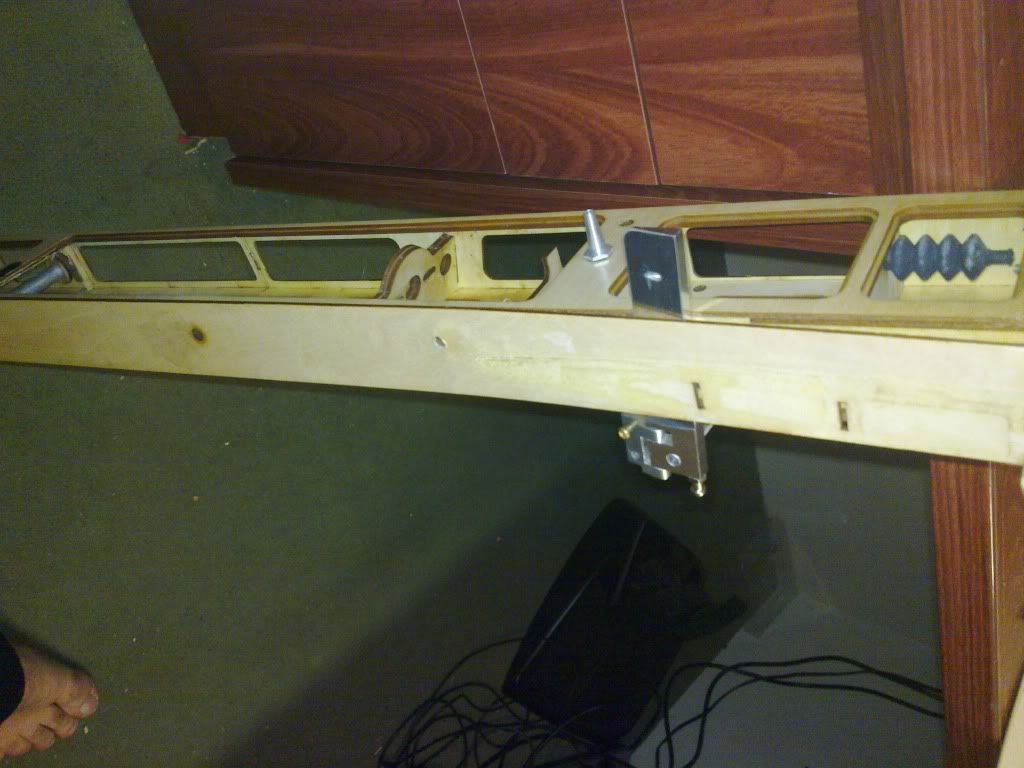
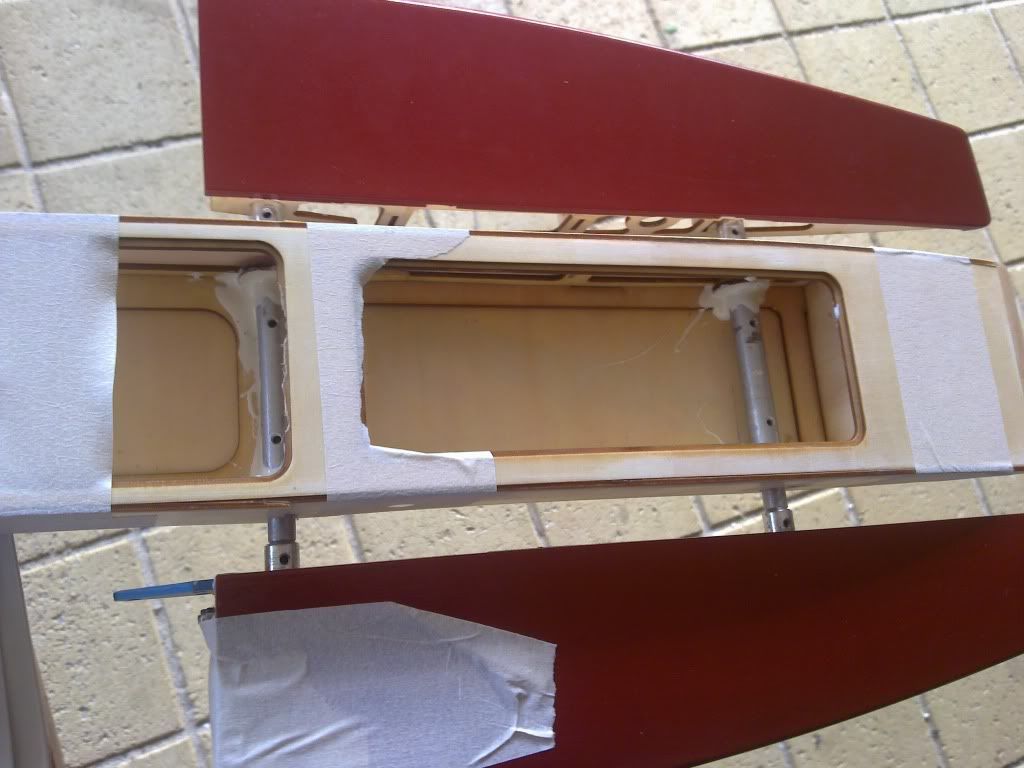
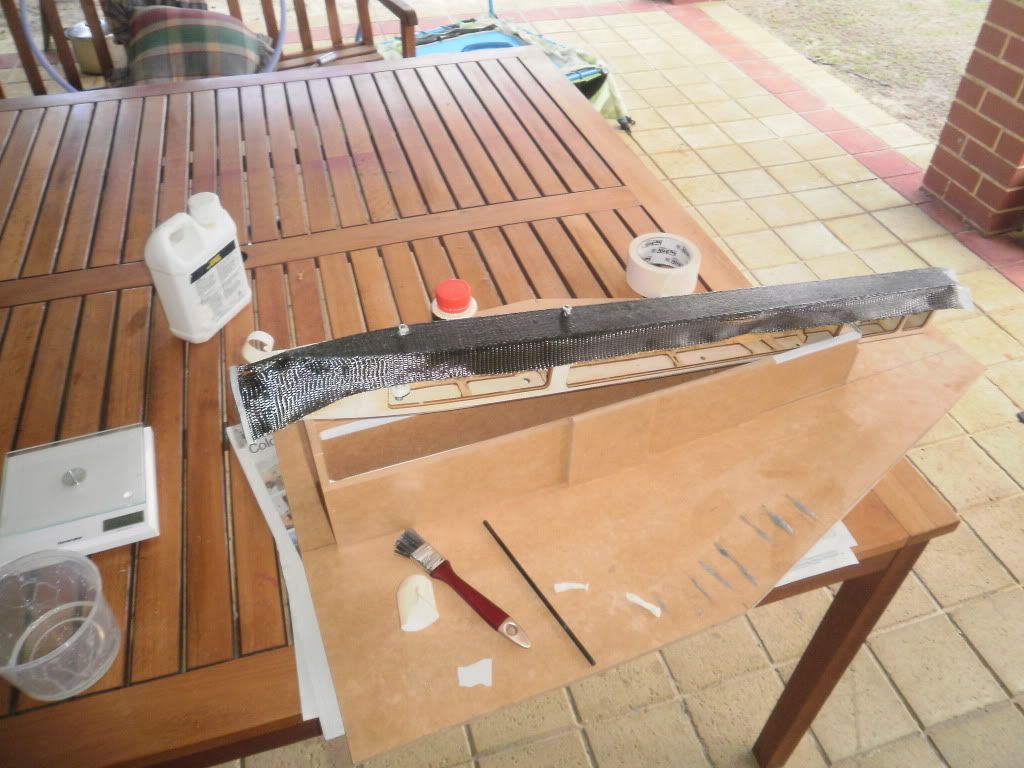
    now after all this has been done the hull looks like this, very workable and i can surly force in my nice big leopard motor where i want it, please note i have ripped out the motor mount and replaced it with a water cooled one funnily enough the ply for my engine mount had already started to delaminate due to water getting to it.

    next job to do was to get the sponson tube holders into a lower position so a battery can fit up front and adjust the position that the front one is at so it can be a bit more forward of its current location to fit a larger battery as the current batteries i have are 145 mm long (Zippy 40c series 5000 mah 2 cell). so i have removed the aluminium tubes and will glue them in to place after i have cleaned up the central tub skeleton a bit


    cheers guys i hope you like this one
    My budget on boats depends on how much money the wife dosent know i have
  • steamboatbob
    Member
    • Jan 2010
    • 51

    #2
    ok a little bit got done today at work i have dropped the height of the boom tubes in the tub and repositioned them so that i can put a 14.8 volt battery or 2, 7.4 volt batteries in. The aluminium tubes are resting flat on the bottom of the hull and i will fix these in with a bit of 24 hour araldite and a small amount of CF tape

    due to the weakness in the hull itself i have gone a little drastic and ordered some carbon fibre tape 5 meters at 100mm wide which i will use to strengthen the tub and after careful looking at the booms i have ordered some carbon rods (not the tubing that is supplied) as i noticed that some of the tubing had started to crack where the grub screws connect. also have given the tub a real good sanding using a bit of 80 grit for the upcomming day or 3 of epoxy work inside and out. and also to get rid of the excess glue that is there


    My budget on boats depends on how much money the wife dosent know i have

    Comment

    • Brushless55
      Creator
      • Oct 2008
      • 9488

      #3
      nice skills man
      looking forward to your new better rigger
      .NAMBA20...Caterpillar UL-1, P-Spec OM29, P-Mono DF33, P-Spec JAE, Aussie 33" Hydro-LSH, Sprintcat CC2028 on 8s, PT SS45 Q Hydro, PS295 UL-1 power, OSE Brothers Outlaw QMono 4-sale, Rio 51z CC2028 on 8s

      Comment

      • siberianhusky
        Fast Electric Addict!
        • Dec 2009
        • 2187

        #4
        Should be good with the rebuild.
        Thats the way I build my ultralight JAE tubs, 1/16 ply open framework covered in 1/32 ply, with a couple more doublers for boom and motor mounts. Makes a light strong hull.
        If my boats upside down then who owns the one I thought I was driving the last two laps?

        Comment

        • steamboatbob
          Member
          • Jan 2010
          • 51

          #5
          oh well a day off work under management orders, feeling a bit under the weather but not sick enough to do a little work on my boat so in the last few days i have basically taken apart the sponsons and it looks like they have been put together with superglue so i have reglued the ribs inside the sponsons to give them a little more strength and like the main tub the glue cracks apart very easily and cleans up really easy. I use waterproof PVA that I use to make solid timber benches for kitchens so atm i have redone them and used some epoxy to hold the sponson tube holder in place when this has cured i will coat the sponsons with resin and fill it with foam.

          Things to do
          - Resin central tub
          - CF central tub
          - Realign and install hardware (Motor, driveshaft)
          - make a new cowling
          - make a ski instead of rear sponsons


          My budget on boats depends on how much money the wife dosent know i have

          Comment

          • siberianhusky
            Fast Electric Addict!
            • Dec 2009
            • 2187

            #6
            Too bad they don't sell that as a kit! Looks well engineered and cut, just did a piss poor job of assembly at the factory. A couple of changes for battery location and they could have a killer kit!
            That is a much more difficult method of building sponsons than cnc cut foam skinned over with ply.
            Strange! That much effort in some aspects, almost none in others. What goes on in the heads of the QC people over there?
            If my boats upside down then who owns the one I thought I was driving the last two laps?

            Comment

            • steamboatbob
              Member
              • Jan 2010
              • 51

              #7
              i agree with ya husky they should offer it as an unbuilt kit but the sposons are an easy build as it is all tabbed anyone with a set of clamps, masking tape and a bit of patience would be able to do a nice build but a block of solid timber to place a turn fin on would be very nice indeed
              My budget on boats depends on how much money the wife dosent know i have

              Comment

              • steamboatbob
                Member
                • Jan 2010
                • 51

                #8
                well the carbon job has started i am just going to put 1 layer of unidirectional tape on the tub to give it a bit of support but mostly im oing it for the look and this is something i want to try out

                found a few great videos from the following website on layering carbon fibre over anything, they use their own products but it seems that it will be the same if i use someone elses products


                for the carbon fibre i am using west system 105/206 and i'll see what i can do for the top coat.

                also i am laying the carbon fibre down and letting it harden on each side and trimming it square before i do any top coats as i want the topcoat to be done in one hit if possible

                and here we are at present, I did find that a small offcut of carbon tube for my outrigger was an excellemt tool for pressing the CF down onto the hull

                and this is the result sofar

                My budget on boats depends on how much money the wife dosent know i have

                Comment

                • martin
                  Fast Electric Addict!
                  • Aug 2010
                  • 2887

                  #9
                  The most popular way to press down carbon or glass cloth is with an old credit card. After applying the cloth & resin use the card held at around 30 degrees as a squeegy & pull it over the carbon. This flattens the cloth & removes any air bubbles but more importantly removes excess resin from the lay up making it lighter. Martin.

                  Comment

                  • steamboatbob
                    Member
                    • Jan 2010
                    • 51

                    #10
                    well ill have to agree to disagree with you on that note mate i have used the credit card method before and had very good results but as the CF was unidirectional the idividual strands were dragged off line and looked bad i did start off with a credit card on this but had to quickly change method while doing this. The roller principal has the same effect as the card removing air bubbles and excess resin. and here is the side done after trimming it back flush to the hull.


                    My budget on boats depends on how much money the wife dosent know i have

                    Comment

                    • siberianhusky
                      Fast Electric Addict!
                      • Dec 2009
                      • 2187

                      #11
                      I like that! Looks awesome and it's functional! Best of both worlds!
                      If my boats upside down then who owns the one I thought I was driving the last two laps?

                      Comment

                      • steamboatbob
                        Member
                        • Jan 2010
                        • 51

                        #12
                        just a few more pics of the carbon going on and the coathanger trick i used to keep the hull out of contact with everything.

                        same process as befor but the winds picked up at home and the temperature dropped dramatically so i put it on a clothes hanger in front of my gas heater to keep the temperature nice and steady

                        Just need to do the top of it and all will be good


                        My budget on boats depends on how much money the wife dosent know i have

                        Comment

                        • martin
                          Fast Electric Addict!
                          • Aug 2010
                          • 2887

                          #13
                          One of the best tips i was given many years ago for curing epoxy By someone i knew who was a world renowned Rc pylon racer who used to manufacture carbon & kevlar planes & boat hulls for other manufacturers was to use a heater box. This was a simple insulated box of whatever size you needed to build that had a common household light bulb inside the box. The wattage of the bulb dictated the temps it could reach, Youd be suprised at the temps reached with just a 60w bulb, This cured the resin fast & very hard that didnt leave that slight sticky feel that you sometimes get ecspecially if its a bit of a damp atmosphere your in. Epoxy likes a nice constant temp but not to high & dry atmosphere. He also used to vacuum bag his mouldings as well. So basically it done the job of an autoclave. I never vacuum bagged mine just used it to dry the resin. Box was just made of polystyrene sheet 1" thick with just a polystyrene top that lifted off. Martin.

                          Comment

                          • martin
                            Fast Electric Addict!
                            • Aug 2010
                            • 2887

                            #14
                            From memory i used to cure at around 90F but could easily go to over 100F with say 100w bulb fitted. The bulbs gives nice steady heat. Martin.

                            Comment

                            • ray schrauwen
                              Fast Electric Addict!
                              • Apr 2007
                              • 9471

                              #15
                              Nice thread. Thanks for doing a tear down of the rigger.

                              I added MAS epoxy to the inside of my hull but, never thought of doing this kind of tear down.

                              Since mooving the boom holders in the tub, are the sponsons deeper now?
                              Nortavlag Bulc

                              Comment

                              Working...