Just my two cents, I would go off what WheelMan was getting at but slot the trim tab mounts rather than the hull holes. Just leaves you less bodywork to address later before paint!
Question/Concern here for anyone willing to answer.
Given that stuffing tubes are sealed around where they enter the hull, they're no longer movable, meaning your stinger angle is set/non adjustable from there on. Are people just going through that much rework when needing to adjust the angle of the stinger (removing the stuffing tube, rebending, and reinstalling/sealing)? Or is this not commonly something that has to be adjusted on a new build during setup? From what I've read, I've been led to believe stinger angle is a critical factor in building a properly running boat. Do I have the wrong understanding of this?
The stinger height is definitely set by the stuffing tube and where it exists the transom, but that does not limit the adjustability of the trim angle. The stuffing tube is usually cut flush with the transom when running a stinger. Assuming you're running a teflon liner, that can exit past the end of the stuffing tube and into the stinger, stopping before the point where the flex cable transitions into the solid prop shaft. The flex cable and teflon liner are free to flex up and down as the stinger trim angle gets adjusted. On one recent build, I cut a small piece of brass tube, about 1/2" long and installed that in the rear of the stinger tube to help support the teflon liner and keep it lined up. I had plenty of room for the prop shaft inside the stinger to not come in contact with the teflon. Some setups might not workout like that.
Just an FYI, there is another build method referred to as a "wet well". A much larger hole is cut in the transom and a tube roughly 3x the diameter of your stuffing tube is installed. That tube only runs a short distance inside the hull, maybe 3-5" depending on the size of the hull. It's capped on the inside of the hull and open at the transom. The stuffing tube passes through the interior cap and out through the rear open end. This allows a significant amount of height adjustment for the driveline since the stuffing tube is no longer anchored at the transom and free to bend from the point where it passes through the water proof, interior cap. It's most often used with a strut setup.
The stuffing tube is usually cut flush with the transom when running a stinger. Assuming you're running a teflon liner, that can exit past the end of the stuffing tube and into the stinger, stopping before the point where the flex cable transitions into the solid prop shaft. The flex cable and teflon liner are free to flex up and down as the stinger trim angle gets adjusted.
Ah, ok. This is what I was missing. My stinger takes in about 3/4" worth of the stuffing tube, so that is where I was seeing that the stinger angle was locked in once the stuffing tube was installed, lined up with the motor. I had not considered cutting the stuffing tube between the outside surface of the transom and the stinger. But I will be doing that now. I am however, not running a teflon liner. I went with 1/4" flex cable and 5/16" stuffing tube, no liner. My stinger does have an o-ring that seals off the space between the stinger and the transom though, so I assume a split in my stuffing tube in that area shouldn't be a problem? I will basically just cut my stuffing tube at the outside surface of the transom, and install the cutoff piece into the stinger. Will probably be a 1/8" or so gap between the two pieces of stuffing tube. This will allow my stinger to be adjustable then. Thanks again for the help!
For sake of keeping water out of the stuffing tube and washing away your grease, you might investigate how mush stuffing tube you can have protrude past the transom, and possibly still into the stinger, while allowing full trim adjustment. Obviously, 3/4" is locking the stinger in place, but there might be a compromised length somewhere. Hard to say without seeing it first hand. As you're messing with it, be sure to watching for rubbing or binding.
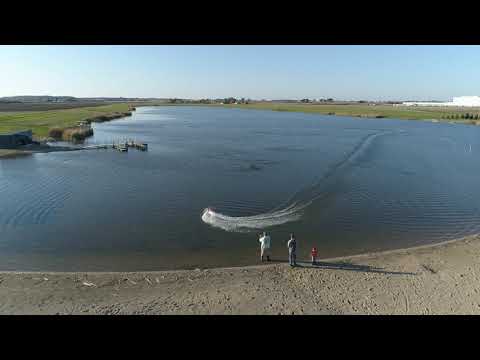
First run is in the books! Took it out Sunday for a test run. Decided I needed to get a feel for where the CG should really be, by actually running it, before locking in the batteries' locations. Glad I did too, because I learned a lot from the experience.
Had to pull it in off the water twice before actually getting the first run in, but each time was for silly mistakes. First time was due to a connection to the servo not being plugged in, so had no steering. Second time was due to not having the ESC parameters correct. But after correcting those little issues, she was off and running.
I believe the maiden voyage was a huge success. Especially given that this was my first boat build. I was very happy with the boat's handling and performance. And the electronics were all very happy. A solid 10 minutes worth of water time total. Two 5-6 minute sessions, with a couple minutes in between where I brought it in to check on temps and move batteries to new location for testing/learning purposes. All that and the Motor & ESC never even got warm. By the end of the second run, the lipos were warm to the touch, but nowhere near approaching hot, and no swelling. I was actually very surprised by all of this.
I did end up running it almost the entire session with a larger prop. Very glad I grabbed that before this. My original 62mm stainless prop was indeed too small, or so I felt anyways. So those of you that warned me, thank you for that, as that is why I made sure to have a larger one on hand. The larger prop is a 70mm 1.4 pitch, and I think the boat ran very well on it.
The only "issue" I noticed with the build, is my stuffing tube was quite hot by the end of the session. Too hot to touch with my fingers, but not hot enough to discolor the tube or flex shaft, or damage the epoxy around it. Pretty confident this is not normal though. So I need to figure out what the issue is there. Based on how I know the flex shaft fits the stuffing tube, and knowing the amount of grease I put in it before this run, I am a bit surprised it got so hot. Especially considering I'm not running super high rpms (I'm well within the recommended range). At this point I can only speculate that possibly the curve in my stuffing tube is not gradual enough. I've done some internet searching on hot stuffing tubes, but have not come up with much for results. Maybe some of you can shed some light on this for me. My stuffing tube is 5/16", the required size by SpeedMaster and OSE for the 1/4" stinger strut I am using. And I know my motor lines up as perfectly as I could get it with the stuffing tube, as the flex shaft goes directly into the coupler on the motor with no help, when fed through the tube up into it. So I know there's no misalignment there.
For sake of keeping water out of the stuffing tube and washing away your grease, you might investigate how mush stuffing tube you can have protrude past the transom, and possibly still into the stinger, while allowing full trim adjustment. Obviously, 3/4" is locking the stinger in place, but there might be a compromised length somewhere. Hard to say without seeing it first hand. As you're messing with it, be sure to watching for rubbing or binding.
I followed your advice btw, and left a bit of the stuffing tube sticking past the transom, into the stinger. But cut it there, and secured the rest of the stuffing tube inside the stinger, so I could retain angle adjustment, as you described.
The only "issue" I noticed with the build, is my stuffing tube was quite hot by the end of the session. Too hot to touch with my fingers, but not hot enough to discolor the tube or flex shaft, or damage the epoxy around it. Pretty confident this is not normal though. So I need to figure out what the issue is there. Based on how I know the flex shaft fits the stuffing tube, and knowing the amount of grease I put in it before this run, I am a bit surprised it got so hot. Especially considering I'm not running super high rpms (I'm well within the recommended range). At this point I can only speculate that possibly the curve in my stuffing tube is not gradual enough. I've done some internet searching on hot stuffing tubes, but have not come up with much for results. Maybe some of you can shed some light on this for me. My stuffing tube is 5/16", the required size by SpeedMaster and OSE for the 1/4" stinger strut I am using. And I know my motor lines up as perfectly as I could get it with the stuffing tube, as the flex shaft goes directly into the coupler on the motor with no help, when fed through the tube up into it. So I know there's no misalignment there.
Even though you have the specified stuffing tube size, there is not that much clearance between the flex and tube for grease, hence the tube heating up. This is increased with the longer run times. I use the next size up with a short piece of 5/16" in the motor end to support the flex, but with such a short shaft it is probably not necessary. The other issue is that the heat is a result of friction, which is wasted power. The other option is to go to a teflon liner and oil (chainsaw bar oil) on the flex.
NZMPBA 2013, 2016 Open Electric Champion. NZMPBA 2016 P Offshore Champion.
2016 SUHA Q Sport Hydro Hi Points Champion.
BOPMPBC Open Mono, Open Electric Champion.
After the stuffing tube heat issues last fall during my maiden run, I decided to cut out my original 5/16" tube, and go with a larger one that uses a teflon liner. After getting this swap finished, I feel 100% better about it. There's better clearance between the flex shaft and the teflon liner than there was with the 5/16" tube, and less resistance when I spin it by hand. Wish I had gone this route in the first place. Live and learn though.
Also, as I try my best to promote new stuff and stay on the leading edge for my followers and customers, I am swapping up from the LMT 3080 (6 wind), to the newest addition in the Lehner line up, the 30100 (5 wind).
Lastly, the hull is currently out for paint, hopefully complete next week. Trying to get her ready for spring!
Haven't updated this thread much, but a lot of work has been done behind the scenes, and she is ready for the water again. Just in time too, as the temperature is rising by the day here in IL. Should have some video in the coming weeks (I hope). But until then, a few photos to share with any of you following the build.
The paint has some unique metal flake in it that's more like slivers of metal rather than flakes, which change all different colors in the sun. The black graphics are all custom cut vinyl I did myself, with a cnc vinyl cutter, some knife-less tape, and a little computer time.
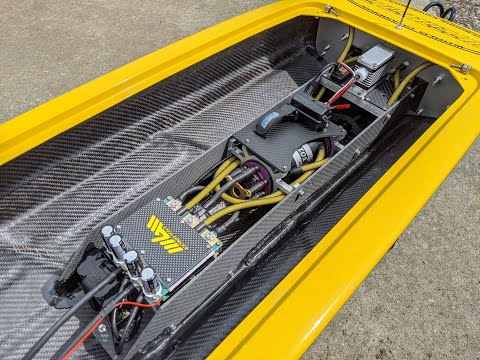
This boat has been built 100% in house, minus the basic exterior hull shape and the paint. Everything else I've fabricated myself.
Placed an order with Mark over at Dinogy Lipos for some larger (16,000mah) packs better suited to this beast. But until those arrive, I will get a few runs in with the MaxAmps I originally planned to use.
Time to hit the water, hope you all enjoy the photos!
I do no know about my speed goal. I have not pushed the boat full throttle yet, as I need to get a few more sessions in on the water to get the battery placement figured out. As of now I've just had the packs stuck in the hull with velcro, as temporary mounting, to learn what placement is best for weight distribution before making permanent battery mounts. This being the case, I'm not comfortable going full speed with the boat in case it were to get out of control and knock the packs loose from their velcro.
Anyways, I got a little video the other day, after it's first time out on the water this year, with all the changes. As I said, no full throttle yet. (Pretty sure I need to move the packs forward a little)

 Tweet
Tweet

Comment