Pursuit mono floodchamber build, first

Collapse
X
 
  • Time
  • Show
Clear All
new posts
  • NativePaul
    Greased Weasel
    • Feb 2008
    • 2760

    #16
    785boats's 2nd photo is of one of my boats, for clarification the hole at the back and the ones down the side are to let water in, the ones in the steps and the one in the bow is to let the air out, you don't need much area of holes to let the air out (especially for fun running as it doesn't matter how fast it rights), but you do need them, and they have to be on top when the boat is floating upside down.

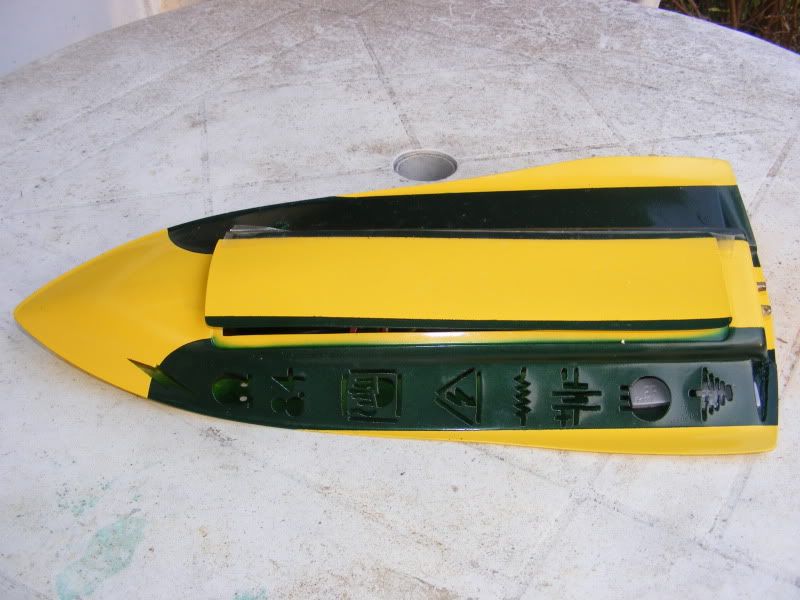
    Hole size matters to some extent, bigger is better especially for the water inlets and I would suggest no smaller than 6mm / 1/4" for an inlet hole, and 3mm / 1/8" for an air outlet. The shape doesn't matter, circles are easy to drill, but if you want to get fancy it wont cause any problems, here is another of my boats, you can see 2 small air outlets drilled in the bottom of the hull through the Ohm symbol on the top deck.


    Usually when self-righting monos have 2 packs they will both be on the chamber side, which would probably get rid of at least one of your water bottles.
    Paul Upton-Taylor, Greased Weasel Racing.

    Comment

    • wakenshake
      Junior Member
      • Dec 2012
      • 22

      #17
      Good to know native Paul love the designs and the guts it takes to put holes in bottom of boat.

      Peter a, I read thread on it and everyone shot it down mainly racers so it never happened. What did happen was updated graphics and the intergrated drivetrain. Which leaves a lot room for food chamber but your limited to 3674 motor size.... And it's new design so I won't trust it wave bashing on Lake Ontario that I do

      Comment

      • 785boats
        Wet Track Racing
        • Nov 2008
        • 3169

        #18
        What a great looking design on that deck Paul. Love it.
        I'm glad you've posted. I'm sure you can offer Wakenshake a lot more help.
        I've had limited experience with only a couple of boats with flood chambers over the years.
        See the danger. THEN DO IT ANYWAY!!!
        http://forums.offshoreelectrics.com/...hp?albumid=319
        http://forums.offshoreelectrics.com/...hp?albumid=320

        Comment

        • wakenshake
          Junior Member
          • Dec 2012
          • 22

          #19
          1.Epoxy filled nose using carbon fiber shaving as filler. is worth doing?

          2.need find stern bracing material besides cf, wood or perforated mat.

          3. Is ok use lead pencil or pen mark out where ill be installing fc wall on hull floor? I want no interaction with epoxy after sand

          4.i bought west peelply but cant remember for life of me if its telfon peelply. I remember somewhere said not to use it if doing additional layups.

          5.for peelply is it ok use bounty towels backer or reason to buy breather cloth.

          6.anyone ever use foam blocks clamped in hull behind peelply to help compress inlay?

          7. small diameter epoxy foam roller, i found metals ones and big ones no small foam ones with little nap

          8.anyone ever do a inlay that wrapped around up underneath bow? inorder to strengthen top of bow where they always crack if hatch flys off

          these are my last minute questions, the epoxy setup in test batch. I now pulled out a second table as work bench is a mess and have everything setup and ready to go. Ill begin tomorrow if i can get some answers to my questions.

          Comment

          • denboy01
            Member
            • Sep 2007
            • 59

            #20
            Flood-chamber-1.jpgFlood-chamber-2.jpgFlood-chamber-3.jpg

            Photos show the layout of a Pursuit hull that self rights OK

            Comment

            • wakenshake
              Junior Member
              • Dec 2012
              • 22

              #21
              Thanks den boy I orginally mocked up the wall using the edge of hatch but it was no where near enough to flip my setup over. I never seen that photo do you know what size battery. Also good to see how someone made a horizontal mount for turn fin as I could not find a manufacture that makes one.
              Awesome stuff guys keep it coming!

              Comment

              • wakenshake
                Junior Member
                • Dec 2012
                • 22

                #22
                I meant vertical bolt hole pattern mount for turn fin not horizontal. I'm backwards....

                Comment

                • denboy01
                  Member
                  • Sep 2007
                  • 59

                  #23
                  Battery is 6000 mah, mounted on left side with speedo and using a few auto wheel balancing weights gives the necessary weight to right the boat. I made the turn fin mount from scrap aluminium.

                  Comment

                  • wakenshake
                    Junior Member
                    • Dec 2012
                    • 22

                    #24
                    well i have my templets for inlay and wall nice n tight and the west epoxy pumps are nice. I primed them but also weighted them to do a accurate test batch. I mixed for minute then checked it in fifteen and it was nice and warm. I came back in hour are it was solid enough to tape and hear a thud. This was in cool basement with epoxy cans at 70' F according to old nitro pen....

                    Still waiting on some input to my questions 1-8.....anybody.....maybe ill post in rcgroups as there more overseas where alot of floodchambers are used. Even though my questions are more general fiberglass layup. Either wayy i think ill keep it simple for my first boat build and keep moving. Ill post some pic tomorrow of rig im working on to compress the in lay.

                    Comment

                    • NativePaul
                      Greased Weasel
                      • Feb 2008
                      • 2760

                      #25
                      Originally posted by wakenshake
                      1.Epoxy filled nose using carbon fiber shaving as filler. is worth doing?

                      2.need find stern bracing material besides cf, wood or perforated mat.

                      3. Is ok use lead pencil or pen mark out where ill be installing fc wall on hull floor? I want no interaction with epoxy after sand

                      4.i bought west peelply but cant remember for life of me if its telfon peelply. I remember somewhere said not to use it if doing additional layups.

                      5.for peelply is it ok use bounty towels backer or reason to buy breather cloth.

                      6.anyone ever use foam blocks clamped in hull behind peelply to help compress inlay?

                      7. small diameter epoxy foam roller, i found metals ones and big ones no small foam ones with little nap

                      8.anyone ever do a inlay that wrapped around up underneath bow? inorder to strengthen top of bow where they always crack if hatch flys off

                      these are my last minute questions, the epoxy setup in test batch. I now pulled out a second table as work bench is a mess and have everything setup and ready to go. Ill begin tomorrow if i can get some answers to my questions.
                      1. That depends how you value strength vs weight. I wouldn't do it, but I race with limited power so light weight is important to me. It will work and give good strength to the nose if you want to do it, but is not the ideal method as the carbon fibre shavings already have enough resin and you are adding more resin, adding chopped carbon strands or even milled glass would be stronger for the same weight.

                      2. I have used Plywood, GRP, honeycomb, end grain balsa composite (the best IMO), and seen aluminium alloy be used.

                      3. I tend to only use small marks if at all, but I would shy away from using pencil as graphite is a good lubricant and can't really be bonded to. My marker of preference is for Staedtler Lumocolor Permanent markers, I have not had any reaction with them.

                      4. I can't really help you with this one as I don't use peelply, I use a perforated membrane instead because I want a smooth untextured finish on most of my projects and can sand to roughen where I need it, I would have thought that if you wanted to bond large areas together the peel ply texture would make things much easier. I suspect that you need less vacuum to suck resin through peel ply than you do a permeable membrane.

                      5. Probably, breather cloth is cheap enough that I haven't tried it though. Breather cloth is softer so it is possible that you may get some print through of the textures with kitchen towel.

                      6. I haven't, but I have only ever done 1 inlay and it was on a flat surface. I have however used foam blocks in composites, spreading apart layers gives huge increases if stiffness with little weight gain compared to adding more layers or increasing cloth weight.

                      7. The ribbed metal ones are for getting air bubbles out of large projects. The 6" foam rollers are sold in hardware stores for painting radiators in houses, sell a West Systems sell a 3" roller that uses a 6" foam cut in half. Personally I use the pour and squeegee method instead of a roller.

                      8. Not me, I've never had an issue in that regard.
                      Paul Upton-Taylor, Greased Weasel Racing.

                      Comment

                      • wakenshake
                        Junior Member
                        • Dec 2012
                        • 22

                        #26
                        You the man NativePaul!! thanks again...

                        1. Any suggestions on how much to use or how far up to fill nose.

                        2.end grain balse it is then...Now is this the thicker stuff thats always next to single ply at hardware store? If so what thickness and do you layup figerglass on balsa or just throw it in with alot poxy. As i hear it likes to soak up.

                        3.well see how it looks after the inlay but i can see the strake through the hull and just plan on using this as my guide. now to sand away that old pencil mark thatll disappear after inlay,lol

                        4.i contacted clcboats waiting on response if not contact west

                        5. ""


                        6.thats a really good idea using it inbetween for strength. Im just gonna use real spongy foam to make sure the inlay doesnt fall off sides and around hatch area as im getting impatient with building a fixture to compress. but Im actually gonna use the lost foam technq. for the female hatch lip hole. I dont want water coming in, so ill layup pocket under bow for that.

                        7. think ill do the same card squeegee as im using peelply it should get most leftover epoxy out and im not racing so lil extra weight wont hurt.

                        8. i thought of doin it in seprate layups with boat upsidedown, but again im getting impatient and just wanna keep moving.

                        Besides this will be my test boat if it doesnt hold together i know the next one needs to be stronger. Or just move to a better hull that doesnt require so much tlc, which would save me time and be stronger from get go. But with full length heavy duty wall it should be stronger enough not to mention theyll be two epoxy filled tips; the hull tip and fc front tip inside. This should help with some extra weight bias on left too! Any suggestions for wall thickness? I know the jan fc build used only two strips fg but hes a racer so i was thicking at least four...
                        Also in a real big one to one application i always criss cross my strips as build up, but being im cutting preshapes out for small inaly and wall, should i augment patterns ninety degrees when cutting out fabric inorder to have the fabric pattern perpendicular to each layer??

                        Comment

                        • wakenshake
                          Junior Member
                          • Dec 2012
                          • 22

                          #27
                          Well guys I'm back at it, had quit the delay with some health issues and what not. None the less I'm back to building this thang. I got the inside sanded out including the bad lifted side seams relaid em. I had one 6oz layer of fg and got it too late so i ended up putting peelply down and never got to second. Well the layup was bad too much epoxy and air bubbles. So I resanded and took my time and did a second inlay of fg followed by peelply and two layers of bounty towels, then put four zip lock bags filled with sand inside hatch area to apply pressure to peelply. This time it turned out great, no pockets of air or epoxy, nice thin porus layer ontop fg to attach fc wall and components to. I also layed up the fc wall with four 6oz layers but was not enough for my standards so I'm gona cut two out and double em up so it's eight layers total. I also cut out balsa stern brace and will be installing that tonite. The fc wall will go in tomorrow before turkey time. Ill post pics soon, can't wait to get her on the lake before the hard water comes.

                          Comment

                          • NativePaul
                            Greased Weasel
                            • Feb 2008
                            • 2760

                            #28
                            Sorry, I didn't see your last post for some reason.

                            1, I don't put any in, but the more you put in the stronger it will be, how much tip strengthyou want and how much weight you are willing to sacrifice is up to you.

                            2, I've never seen end grain balsa at a hardware store. It is a pretty specialist product for composite manufacturing, but I think our stores here in the UK tend to be smaller than the ones in USA, so maybe. It being end grain is very important for crush resistance, and you can easily tell it from the other 99.9% of wood that is cut with the grain, by looking at the grain pattern. Over here the thinnest we can get is 5mm, I suspect it will be 1/4" in USA. Yes you want to lay FG on top of the balsa, the balsa adds little stiffness on its own, the stiffness comes from its high compression strength keeping the FG layers above and below it a fixed distance appart. Adding just 1 6oz layer will give huge stiffness benefits, but the surface wont be hard enough to stop the bolts pulling through so I would recommend using more layers at least locally around the bolts. It will drink resin if you let it, and if it does it offers little benefit over coremat, don't thin or heat the resin, use enough to wet the cloth properly but make sure you squeegee off the excess quickly. Then weigh down with your bags of sand.

                            I have only done 2 layer flood chambers myself, I'm a racer too, the boat should already be strong enough and the wall is just there to keep water out not add strength, frankly on our race boats that only turn right I am not even sure we need to have the hull on the other side of the chamber wall at all. Having said that you can see the cracks around Denboy01's exit hole and it wouldn't be a bad idea to do some local re-enforcing around the chamber exit locally to avoid that.

                            Twisting cross or twill weave 90degrees will do nothing as it is already oriented at 90degrees, that will only work if you are using unidirectional cloth. Alternating layers at 45degrees will however add significant twist resistance to a layup if you need it.

                            That balsa is end grain isn't it? Balsa has very little crush resistance along the grain, and if it is not end grain you would be better off with another material.
                            Paul Upton-Taylor, Greased Weasel Racing.

                            Comment

                            • wakenshake
                              Junior Member
                              • Dec 2012
                              • 22

                              #29
                              Hey Native, its been a minute. Thanks for the follow it was right on time.

                              Ok so i went to jamestown distributers site and watched video on composite materials. And figured out that I just must of got peice balsa ply . According to jtd, End grain is small chunks of balsa weighted for density then glued back together to create a consistent density piece of balsa.

                              So then I shouldn't use the balsa piece i got which is from midwest it's craftply 3mm, I figured combined with the factory installed perforated core mat it would suffice and I laminated a test peice with 1layer 6oz and its rock solid for twist and snap. But for other reasons as crush resistance your sayin not to use this?

                              I'm gonna go see if I can crush it with pliers and screwdriver,lol. Cuz I really wanna get this together and fell asleep beffore i got it in last nite. I'm gonna have to order the end grain cuz it's not in stores thinnest i found was 3/8 too thick. This is gona set me back..

                              Comment

                              • wakenshake
                                Junior Member
                                • Dec 2012
                                • 22

                                #30
                                I just used pliers and screwdriver and its pretty darn hard. It's three ply and I used good plier and strong grip,stuff solid so I'm gonna let it roll on this prototpe. I'll be sure to source some thin end grain for future builds.

                                My plan is to laminate front all pretty with couple layers glass, try not to soak in the ends till install. Come install time wet out stern and back n sides of wooden inlay, let it set for a bit. While mix in some west systems 404 for the install and shaping out fillets on sides...

                                Comment

                                Working...