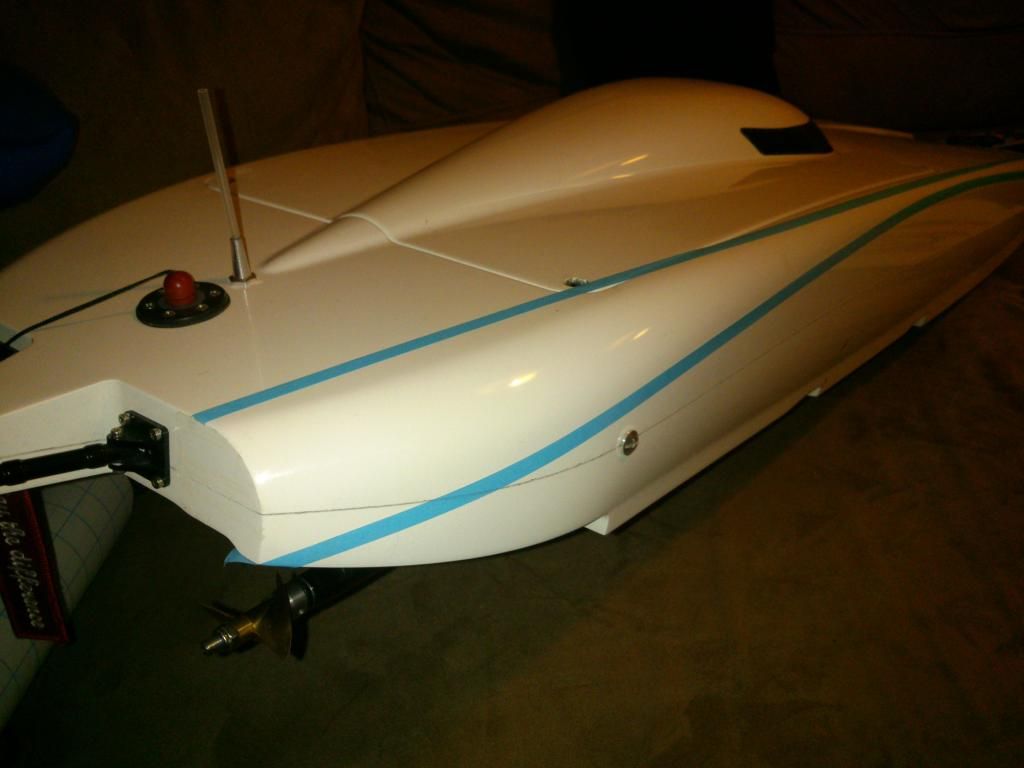
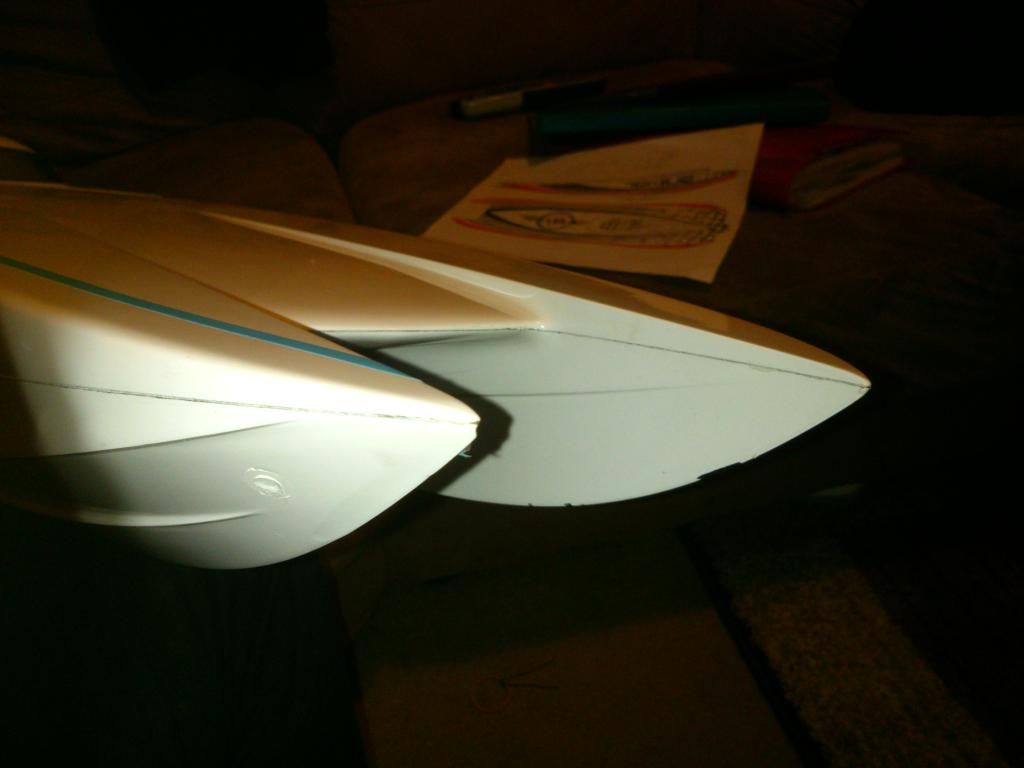
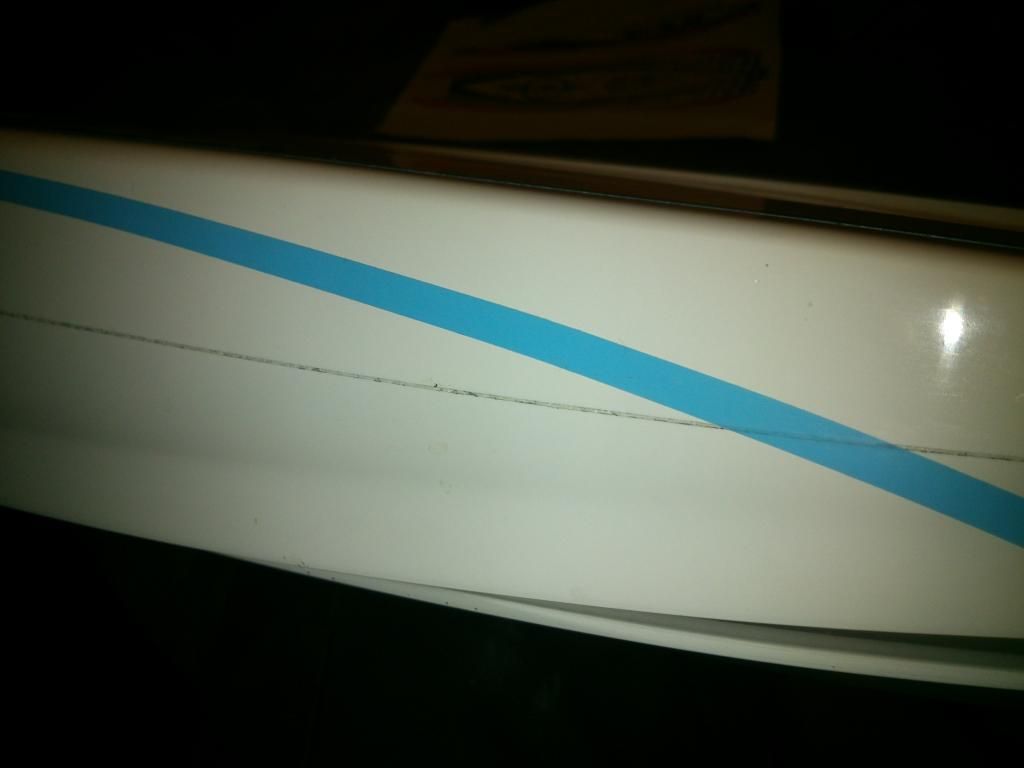
HPR C5009 Bulletproof Animal build.

Collapse
X
 
  • Time
  • Show
Clear All
new posts
  • KillerDave
    Senior Member
    • Oct 2009
    • 370

    #166
    Thanks Titu!

    I have decided not to take the HPR... I'm not going to get much time to get on the water anyway... Oh well...

    I will hit it when I get back....

    On another positive note, I have found another lake with much more open water so after a little testing, I'me going to get myself over there to have some fun!
    HPR C-5009, Riptide48, PaynPak 1/12, Miss Budweiser 1/8 Hydro, Miss Freya (own design 1/8 Hydro), HOR 32, Twin 380 HOR 32, Magin one

    Comment

    • KillerDave
      Senior Member
      • Oct 2009
      • 370

      #167
      Hi folks!

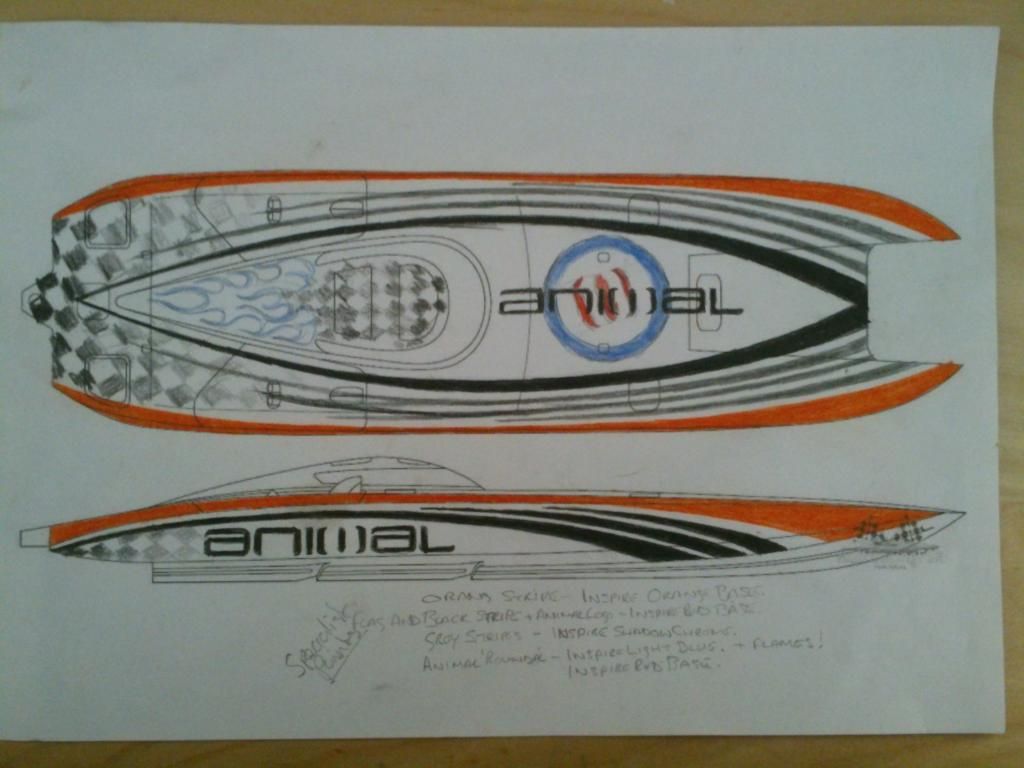
      I have decided to throw some paint on this thing!

      This is something that scares the crap out of me as it can either make or brake a boat...???

      Here is my design just sketched over a line drawing.... I'm not sure I'll keep the chequred flag or the flames???


      Anyway,

      Can anyone advise me on getting rid of the seam please???


      Mant thanks....
      HPR C-5009, Riptide48, PaynPak 1/12, Miss Budweiser 1/8 Hydro, Miss Freya (own design 1/8 Hydro), HOR 32, Twin 380 HOR 32, Magin one

      Comment

      • flraptor07
        Fast Electric Addict!
        • Aug 2013
        • 2451

        #168
        That paint design looks awsome! As for the seam, on my Cheetah I sanded it with 180 to start then I used 3M glazing/spot putty part# 05096 then worked it down with 220 grit (you'll probably need to do a couple layers) then primed it and prepped for paint as normal.

        Comment

        • Fella1340
          Fast Electric Addict!
          • May 2013
          • 1035

          #169
          I know lots of guys use the 3m glazing putty and report good results but it's polyester based and not really meant for epoxy fiberglass filling and repairs. I'll probably get roasted for saying that but an epoxy based product should be used to fill epoxy fiberglass/carbon fiber products. Regular layup resin can be used with microballons or milled fiberglass to achieve desired consistency. Applying and sanding it is a lot more work but it won't shrink and adhesion will be much better.
          I have a dozens of product available to me that are meant for professional auto body repair (my father hand builds hot rods/old cars). They would make the job a snap but problems down the road are very likely and there just not the proper fillers for the job. There is epoxy based marine putty available if you search around but I haven't used any of them personally.

          Comment

          • flraptor07
            Fast Electric Addict!
            • Aug 2013
            • 2451

            #170
            I was just looking at the MSDS sheet and the 3M green 05096 spot putty is Acrylic based. I had to look to be sure and BTW I Co-own a Resto/Street Rod shop.

            Comment

            • Fella1340
              Fast Electric Addict!
              • May 2013
              • 1035

              #171
              Ok, so it's acrylic based. One of the things I learned from experience is that one part putty, whatever it is should be avoided unless absolutely necessary. And then only to fill fine pin holes or the smallest scratch. Be it polyester, acrylic or whatever if it's a one part putty it will continue to dry and shrink over time. That's just the way it works. Filling the gap Separating the upper and lower hull and smoothing it out is just beyond the boundaries the stuff is good for. Most high end paint shops won't use it at all.
              I asked my resident expert about it and he had a few choice words about the 3m green in particular, seems it's been around for some time and my father has seen many nice paint jobs ruined by the 3m green and other one part putty/glazes. Two part putty is really the only way to go if your looking for something that will last. Most of these don't apply to epoxy resin boats any more than the one part stuff does.
              A very safe bet for lasting results is to use epoxy resins and thicken to a putty. Yes it takes awhile to cure and is more difficult to sand but 5 years from now it will still look as good as the day it was done. A friend of mine with many years experience using epoxy resins and fiberglass recommended Marinetex two part epoxy putty but also said that if you have epoxy resin already that thickening it will achieve the results but is a little more difficult to sand down. The consensus though from listening and learning from those that have been at this stuff a lifetime is the one part putty/glazes have very little to no use in the body shop these days.
              I have the same type of work coming up and will be doing the paint myself. I haven't settled on a particular product yet but I know what I will be avoiding. There's just to many hours work involved to pick a product illsuited to the task even though it would cut work time way down. This is just my opinion and point of view and I'm sure a lot of people have used the one part stuff with great sucess. I just think it's the wrong stuff for the job at hand here.

              Comment

              • flraptor07
                Fast Electric Addict!
                • Aug 2013
                • 2451

                #172
                I'll agree, on a $10,000.00 custom auto paint job I wouldn't use it either. But on a RC boat that's gonna get scuffed up racing it, it's good enough and you'll probably repaint it long before you notice any shrinkage problems.

                Comment

                • Fella1340
                  Fast Electric Addict!
                  • May 2013
                  • 1035

                  #173
                  I was just offering advice as to how I would look at it, when it comes to body work there's a thousand different ways to get from A-B let alone A-Z! I remember being told 25 or so years ago when messing around with fullsize fast boats that when it comes to fiberglass if it's epoxy resin to start or an epoxy resin repair that the only thing that goes over epoxy is epoxy. I was teenager and learned the lesson the hard way more than once! I have no doubt that there are hundreds of rc boats out there that have paint jobs looking good years later using one part putty.
                  Your right about the price, if your laying down big dollar paint then use the best that there is, if it's just a basher or will get bashed up racing then the putty would be nice and easy. I actually like the stuff because it's so easy to use and own it myself.

                  Comment

                  • KillerDave
                    Senior Member
                    • Oct 2009
                    • 370

                    #174
                    Thanks for the advice, I will do some searching...
                    It looks like I'm in for hrs of sanding and filling! :-/
                    I actually do have a heap of resin and micro ballons so I think that's the way I'll go...???
                    So, as it is right now, some of the seam is outside of the surface...

                    Should I dig this out to give the filler somewhere to sit??? or just sand it down and fill from there?

                    To me, this is as much a show boat as a bloody fast toy! ;-) I'm lucky that I am the only one at our club with anything this fast! so, when I turn up at the lake, they say... "wait for everyone to be off the water before you put that thing in!" Lol... I think they're scared! so... There's not much chance of it getting bashed up!

                    I am getting airbrush masks made as we speak so, with any luck, I might get paint on it soon!

                    It'll probably be out of the water most of the winter anyway, we have just got a cold snap and the lake has ice in it.... if it keeps going, that's it.... no boating! 'til Feb/March....
                    HPR C-5009, Riptide48, PaynPak 1/12, Miss Budweiser 1/8 Hydro, Miss Freya (own design 1/8 Hydro), HOR 32, Twin 380 HOR 32, Magin one

                    Comment

                    • Fella1340
                      Fast Electric Addict!
                      • May 2013
                      • 1035

                      #175
                      Dave, i did write a reply in detail but it didn't post and got deleted I would start with resin and microballons and fill the seam. What do you mean by the seam is sticking out? A photo would be great. My experience runs with fiberglass and metal so I hope some guys jump in that have been down this road and know the pitfalls to look out for.

                      The main difference will be the difficulty sanding down the Cf/k and resin each side/around it. The resin will sand much faster than the Cf/k and you can quickly find yourself worse off than when you started if your not carefull. I would carefully check the boat to locate any real high or low spots and mark them so you start giving yourself a "road map". This boat being the king of King's it should be very straight. I use a piece of 1/8"x3/4" oak and use the edge to check straight runs and the flat for curves. It's about 30" long and was checked on the mill bed to ensure true. I have smaller pieces for smaller areas.(a yard stick may ?work here, small flexible steel rulers as well) I am just gathering things as the rest of my build comes together. The other thing that has proven itself and I consider it a must now is a 3m flexible rubber sanding block. It's about 3"x5" and is perfect for this type of
                      work where everything is a curve. I wanted to post a picture of it but can't find it anywhere, typical! (google search brings it up)You want to minimize using sandpaper and your finger tips for sanding as much as possible.
                      I was out today and bought the west systems 410 micro light fairing filler to use on my boat, seam came finished with this hull:) Prep work for a proper bonding surface is everything here, putting the resin putty in the seam is the quickest part of the job.before you start it may be a good idea to true the hull seam as much as possible. Using a sanding block that easily follows the curve is very important.

                      Purchasing the 3m sanding block or something similar will save a lot of time and ease frustration significantly. You may even have something around that will work. Check and mark the hulls high and low spots and mark where either the top needs sanding to meet the bottom or the other way around. Get it as good as you can. Prep seam and fill it. You'll be happy you did the other work before adding resin to the seam! Sand the seam down and keep checking the hull, marking highs and lows till your happy.

                      You may end up wanting the 410 to really be able to feather the edges out. It's was $16.50 Canadian. The sanding block was less than that, it was bought quite awhile ago. I would feel much better if others were offering different methods or things to he aware of. You want it to be perfect, it's a HPR afterall!
                      Good luck, it may be a good idea to post a new thread asking for this specific type of help. Guys like Randy at BBY can do this stuff in there sleep and have the Cf/k experience that is really needed here. The advice could save you 10hrs sanding and net you an excellent job. I think it would be worthwhile to do. Good luck!
                      Last edited by Fella1340; 11-08-2014, 12:57 AM.

                      Comment

                      • jcald2000
                        Senior Member
                        • May 2008
                        • 774

                        #176
                        Shoebox seam?

                        Comment

                        • Fella1340
                          Fast Electric Addict!
                          • May 2013
                          • 1035

                          #177
                          The seam is flush

                          Comment

                          • KillerDave
                            Senior Member
                            • Oct 2009
                            • 370

                            #178
                            Thanks Fella!

                            I may have been a little over critical of "sticking out"...

                            Really looking closely, there are very few areas that are outside the surface. those points that are outside, I can rub down and fill...

                            I will start another thread to get a wider response.

                            Thanks for your help...
                            HPR C-5009, Riptide48, PaynPak 1/12, Miss Budweiser 1/8 Hydro, Miss Freya (own design 1/8 Hydro), HOR 32, Twin 380 HOR 32, Magin one

                            Comment

                            Working...