1/10 Baby Bootlegger Build

Collapse
X
 
  • Time
  • Show
Clear All
new posts
  • AndyKunz
    Fast Electric Addict!
    • Sep 2008
    • 1437

    #1

    1/10 Baby Bootlegger Build

    Several years ago I promised my wife that I'd build her a big mahogany boat for the top of the piano. She's a patient lady! What got me off my duff was that she said I could buy a turbine... as soon as I got rid of a 4' cube of airplane kits and built her the boat I promised. Within 5 minutes both boys were assigned kits :) Last night I started on her boat.

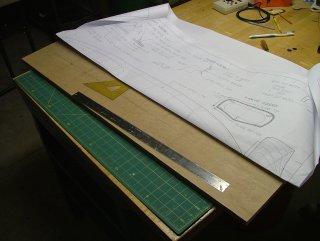
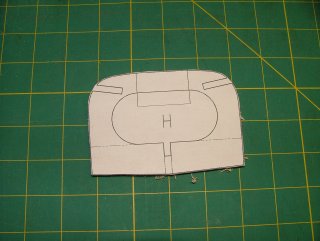
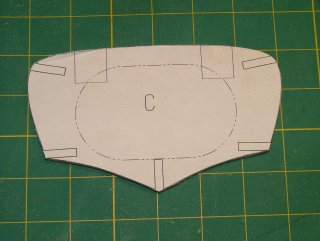
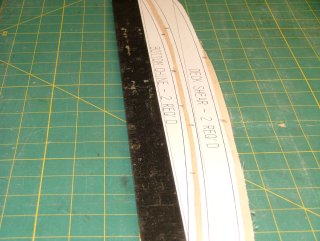
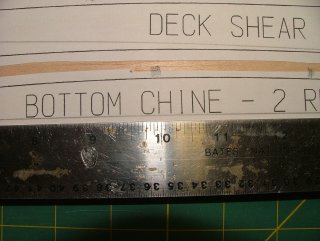
    The plans are Garry Finlay's, which you may find on the Astec Marine site. Garry sized them to fit nicely on E-sized paper. You can download the PDFs (2 pages) and have them printed for just a few dollars at Staples or Kinkos. Note that Garry is in the process of updating the plans as I find minor issues. They are fine for building - we're just working to make things perfect.


    Full-Size Image

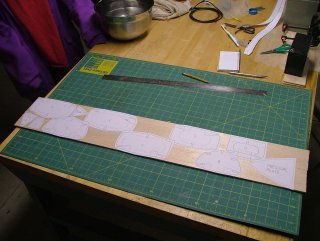
    I began with a trued plywood base that is oversize for the boat. I added a straight centerline, then marked off the locations of each bulkhead.


    Full-Size Image

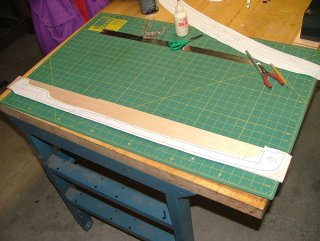
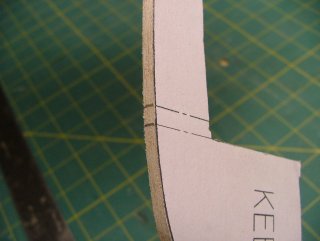
    Then I used a triangle to make a pair of lines 3/16" apart (the thickness of the wood) across the width of the plank and labeled each pair of lines with the corresponding bulkhead letter.

    So much for Monday night.
    Spektrum Development Team
  • Ocean Racer
    Senior Member
    • Sep 2007
    • 502

    #2
    so no videos of her floating along the pond.....sniff...sniff
    Failure is the First step to SUCCESS

    Comment

    • AndyKunz
      Fast Electric Addict!
      • Sep 2008
      • 1437

      #3
      My daughter Lena is going to be helping me with this build. I forgot to mention that last night we also joined two 3/16" sheets to form a 6" wide piece. I used hard balsa because I want to have strong bulkheads. You'll see the piece in the pictures below.


      Full-Size Image

      Tonight we started out by laying the keel out on a sheet of 3/16" x 3" x 36" hard. It was necessary to join a piece at the bow to make it tall enough, and to add about 1/4" down the center to make it deep enough. If you use 4" wood you won't have a problem but you'll have more waste.


      Full-Size Image

      Next we cut out all the bulkheads from Sheet 2 of the plans (I printed two Sheet 2's - you'd be smart to do the same). Using 3M #77 spray, they were laid out on the 6" wide plank we made last night. They fit nicely, we very little waste.

      I didn't take a shot specifically of it, but in the picture above in the top right corner you can see that I have two pieces of 3/16" stacked together (a few dabs of glue between them) and clamps. They are going to be the deck sheer and the chine pieces. I had to remove a moon-shaped piece and relocate it to the top so that I could cut both items out of two pieces of wood without splicing in virgin pieces.

      Tomorrow we will show you how to get long, thin paper pieces glued down straight on a sheet like that.


      Full-Size Image

      Next, I cut out the bulkheads from the 6" wide sheet. First I rough cut them (1/8" - 1/4" oversize) just to separate them into manageable chunks.


      Full-Size Image

      Still using the jigsaw, I then trimmed them much closer to the lines (within 1/32"). Note that the notches for the keel, chine, and sheer are not cut out yet. Doing so would have made those corners too fragile.


      Full-Size Image

      Next, I sanded each piece down to the line. (In the background you can see a 54" Comet Taylorcraft that I'm also building with my son Caleb, but not doing a thread about).


      Full-Size Image

      When done, you end up with a stack of bulkheads looking like this. Thursday night we will be cutting out the notches.

      Andy
      Spektrum Development Team

      Comment

      • Steven Vaccaro
        Administrator
        • Apr 2007
        • 8718

        #4
        Must be nice to work on boats again!
        Steven Vaccaro

        Where Racing on a Budget is a Reality!

        Comment

        • AndyKunz
          Fast Electric Addict!
          • Sep 2008
          • 1437

          #5
          Yup. Nice to work with Lena too. She's learning the camera pretty quickly and learning all the terms for the hull parts. I'm working on 2 planes at the same time, too. One is a magazine construction article, the other for flying indoors at the Armory this winter. AND doing an electronics consulting project.

          AND writing about it all.

          Andy
          Spektrum Development Team

          Comment

          • Jr Branham
            Junior Member
            • Oct 2007
            • 21

            #6
            work shop

            Andy,
            Is that your work shop area??? Looks more comfy than a cold garage....

            Jr. B

            Comment

            • JimClark
              Fast Electric Addict!
              • Apr 2007
              • 5907

              #7
              Great job on the pictures Lena oh and you to Andy nice to see you making sawdust again
              What you using for Mahogany?
              What are you going to use for power of the BBL?

              Jim
              "Our society strives to avoid any possibility of offending anyone except God.
              Billy Graham

              Comment

              • AndyKunz
                Fast Electric Addict!
                • Sep 2008
                • 1437

                #8
                Jr - it's the unheated garage, except for a small ceramic heater that takes the edge off. I think I'm going to be doing a lot of modeling in my office this winter. I don't think the walls are insulated and the garage door has big gaps around the top and sides to let the cold in. Pretty shoddy installation, imho, but I'm just renting for the year so I can't complain.

                Jim - I bought a whole bunch of 1/16x4x48 mahogany a few years ago specifically for this boat. I'll need to cut a lot of it down to make strips to plank. I just need to buy a 10" table saw to cut it.

                I'm not sure if it will be powered. Gail said it doesn't need to be, and it would take a lot of time out of the project, but I will probably build it so that it CAN be powered. It would have BJ26 power system in it, and room for a 3S/4S pack, and a Spektrum radio.

                Kmot put me in touch with a fittings place. When we get closer I'll order and see how they look. I need a scale-like prop for it as well. I have photos of the real boat from the Clayton regatta, so I'll do my best on the details. I doubt it will be of ERCU quality, though.

                Andy
                Spektrum Development Team

                Comment

                • JimClark
                  Fast Electric Addict!
                  • Apr 2007
                  • 5907

                  #9
                  How about sharing the link for the fitting's place?
                  And I don't care about ERCU quality anymore!!!!!!!!!!!!!!!!!!!!!!!
                  I just like building models and probably the one thing that stopped me from building a BBL was the fittings.
                  I have a bunch of really good Mahogany and just need to cut it down into a good size for making planks as right now ie is in big chunks.

                  Jim

                  Originally posted by AndyKunz
                  Jr - it's the unheated garage, except for a small ceramic heater that takes the edge off. I think I'm going to be doing a lot of modeling in my office this winter. I don't think the walls are insulated and the garage door has big gaps around the top and sides to let the cold in. Pretty shoddy installation, imho, but I'm just renting for the year so I can't complain.

                  Jim - I bought a whole bunch of 1/16x4x48 mahogany a few years ago specifically for this boat. I'll need to cut a lot of it down to make strips to plank. I just need to buy a 10" table saw to cut it.

                  I'm not sure if it will be powered. Gail said it doesn't need to be, and it would take a lot of time out of the project, but I will probably build it so that it CAN be powered. It would have BJ26 power system in it, and room for a 3S/4S pack, and a Spektrum radio.

                  Kmot put me in touch with a fittings place. When we get closer I'll order and see how they look. I need a scale-like prop for it as well. I have photos of the real boat from the Clayton regatta, so I'll do my best on the details. I doubt it will be of ERCU quality, though.

                  Andy
                  "Our society strives to avoid any possibility of offending anyone except God.
                  Billy Graham

                  Comment

                  • icelert
                    Senior Member
                    • Dec 2007
                    • 102

                    #10
                    Andy,
                    Nice job on the project-it's great that your doing this not only for your wife and with your daughter but also for taking the time to share it with us.

                    A suggestion for cutting the mahogany pieces, it's cheaper and safer than a table saw, I made nice .2" wide mahogany strips with my current boat project the 66 Bud.


                    This cutter is also the cat's meow for cutting lightweight fiberglass and especially carbon fabric!

                    Bryan
                    Attached Files

                    Comment

                    • Darin Jordan
                      Fast Electric Addict!
                      • Apr 2007
                      • 8335

                      #11
                      Originally posted by icelert
                      ... my current boat project the 66 Bud.
                      Bryan... I'M NOT WORTHY... I'M NOT WORTHY!

                      REALLY fine work, dude! That's amazing...

                      Can't wait to see more Andy! COOL project!
                      Darin E. Jordan - Renton, WA
                      "Self-proclaimed skill-less leader in the hobby."

                      Comment

                      • AndyKunz
                        Fast Electric Addict!
                        • Sep 2008
                        • 1437

                        #12
                        Click on the table saw link, Bryan 
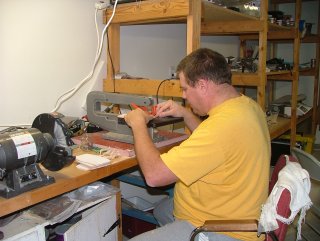
It ain't no Harbor Freight! I need it for ripping balsa stock in the future - an investment. All those good terms. I need a Forrester blade for it too - no sense having a good saw and using a $10 blade in it.

                        I use those blades you linked already. They're great for glass - in fact I had to buy my wife replacement blades for hers back when I was manufacturing hulls.

                        I'll give it a try on the mahogany but I don't expect success. The wood is ten years old and very dry. I'm going to have to increase its humidity just to be able to use it at all. (My Dad's a cabinetmaker so we have the tools to do that properly).

                        Andy
                        Spektrum Development Team

                        Comment

                        • Doug Smock
                          Moderator
                          • Apr 2007
                          • 5272

                          #13
                          Cool project Andy, keep up the good work!

                          Doug
                          MODEL BOAT RACER
                          IMPBA President
                          District 13 Director 2011- present
                          IMPBA National Records Director 2009-2019
                          IMPBA 19887L CD
                          NAMBA 1169

                          Comment

                          • Avanti
                            Fast Electric Addict!
                            • Nov 2007
                            • 1280

                            #14
                            Very cool, I was thinking about building one of these after seeing the link in docjets thread.
                            I will be watching your progress.

                            John
                            The Manx has been sitting dormant, but I think I finally have my motivation back. I hope to see it float soon.

                            Comment

                            • AndyKunz
                              Fast Electric Addict!
                              • Sep 2008
                              • 1437

                              #15
                              First item tonight - link to the fittings (thanks to Kmot). http://www.wetgoose.com/ His name is Ken Valk. I have not yet contact him, but I trust Kmot.

                              OK, on to tonight's progress. Lena and I continued working making parts. The other night I left the chine and sheer rough stock drying under weights. Tonight we put the paper templates on and cut them out.

                              Putting long, thin paper templates down straight requires use of a little trick. Prior to cutting the strips out of the large paper, I made a straight line down them using my 2' straightedge. You can see it near the pencil in the photo below.


                              Full Size Image

                              Using the straightedge to verify that I haven't deformed the paper on the rough cut blank, I scribbled dark areas about every 6" around the perimeter of the paper template.


                              Full Size Image

                              Next, I take the long strips over to the spray backstop (an old set of plans) that I put on the garage door and use #77 to make them sticky. Man do I look fat in that one!


                              Full Size Image


                              Full Size Image

                              Next I carefully lay them down on the blank, and use the straightedge to verify that I haven't twisted the paper any. If you do this quickly, the #77 will allow you to peel up the paper to get the positioning correct. I then allow it to dry for a few minutes before cutting on the jigsaw.


                              Full Size Image

                              After cutting out the keel (which is laid out using the same technique), I marked on the edges where each bulkhead will go. I then peel off the paper and label each set of marks for the bulkname name. I also marked the entry/exit locations of the driveshaft. These will be drilled out with a 1/8" bit BEFORE we go any farther with the keel. Also the rudder post hole. Having pilot holes will come in handy when it comes time to install the hardware.

                              After we finished those steps, we cut the notches in the bulkheads. No pix - I figure that's self-explanatory.

                              Tomorrow night we will be adding the tabs that lift the bulkheads above our building plank. We are almost done "making a kit" so we can begin construction.

                              Andy
                              Spektrum Development Team

                              Comment

                              Working...