


Ok guys, i know everyone has been having the wire drive failure just like i have. I love the boat, but after only 4 runs in a month because ive snapped one and lost the spare to the depths because of the crappy set screw coupler that comes stock with the minimono i got tired of it. So i decided to do a little research online and pieced together my own custom flex drive wire system. So lets jump on in.
Listed are the parts you will have to order, yours may vary but this is what i used for my system.
Octura .098 Flex Drive Wire, assembled.
http://www.offshoreelectrics.com/pro...oct-oc098L-24c
Octura Coupler
http://www.offshoreelectrics.com/pro...oct-ocfhe18098
K & S Stuffing Tube part# 129
http://www.offshoreelectrics.com/pro...rass-tb&cat=70
*OPTIONAL*
Octura Purple Plastic y531 Prop
http://www.offshoreelectrics.com/pro...?prod=oct-y531
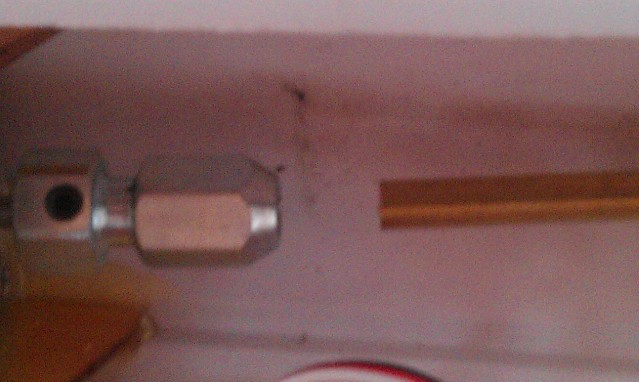
First we are going to start off by removing all the old drive components, you will have to remove the battery/servo tray first, which i used a small flathead screwdriver and pried up on the corners until i was able to use my fingers to pop it out. It is held in by glue. This is what you should see after that is done. (i already installed the octura coupler in this picture)
Next you will have to remove the stock stuffing tube to be able to fit the larger one on. I did this by using a set of pliers and twisting it back and forth until the glue released it and i pulled it out the back. You will then have to drill out the tube holder and the rear of the boat larger to accomodate the larger stuffing tube. Cut your new stuffing tube to length, i used a dremel for this process, do the same for your flex cable, make sure you leave extra room, its easy to cut too much. Hunker the tube down with some glue, later test it in the tub to make sure its water tight. This is what it will look like.
Next on the list is to align it properly to the motor coupler so that it reduces as much friction and premature ware on the drive line. I did this by using the end of a drill bit and pulling lightly over and over again in small incriments to make sure i didnt kink it or bend it too much, i really like the way this boat it setup, i only had one bend that i had to make. When your done, it should like this.
Now go ahead and assemble the rest of system and do a test run on the stand to make sure everything is proper aligned and nothing is catching before you glue back down the battery/servo tray into place. I should mention that the drive shaft prop that came with the system was too small and had a good amount of play in the stuffing tube, i remedied this by cutting a small piece of teflon off what i had left over and slid it over the drive shaft prop with made it fit snuggly into the tube with very minimal resistance, if any at all.
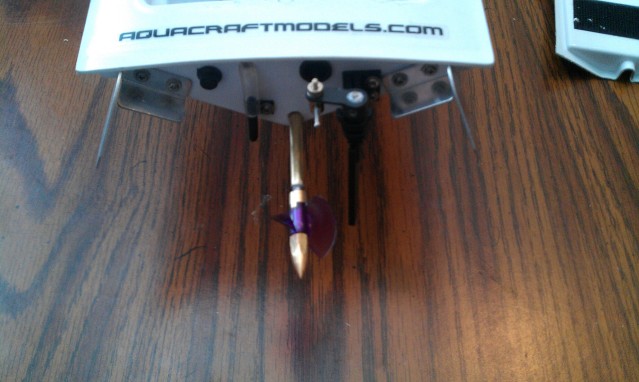
Here it is assembled.
And a shot of the new prop with the bullet nut provided in the ose flex cable system.
Heres a shot of my workstation and my new MC!
First impressions.
I love it. I ran one pack and it was trouble free. The boat sounded quieter, the stock wire drive system seemed to cause a lot of vibration and noise, this new system seems to tone that vibration down a lot. I love the way it sounds, very very little resistance when turning the prop/flex cable by hand. Everything was water tight, had maybe a drop or two in the hull after a 7 minute run. Coupled together with the new prop, this setup seems very good and i plan on running it trouble free for a while. If you have any questions, comments, or suggestions, please by all means share.


 Reply With Quote

Bookmarks