 Tweet
Tweet
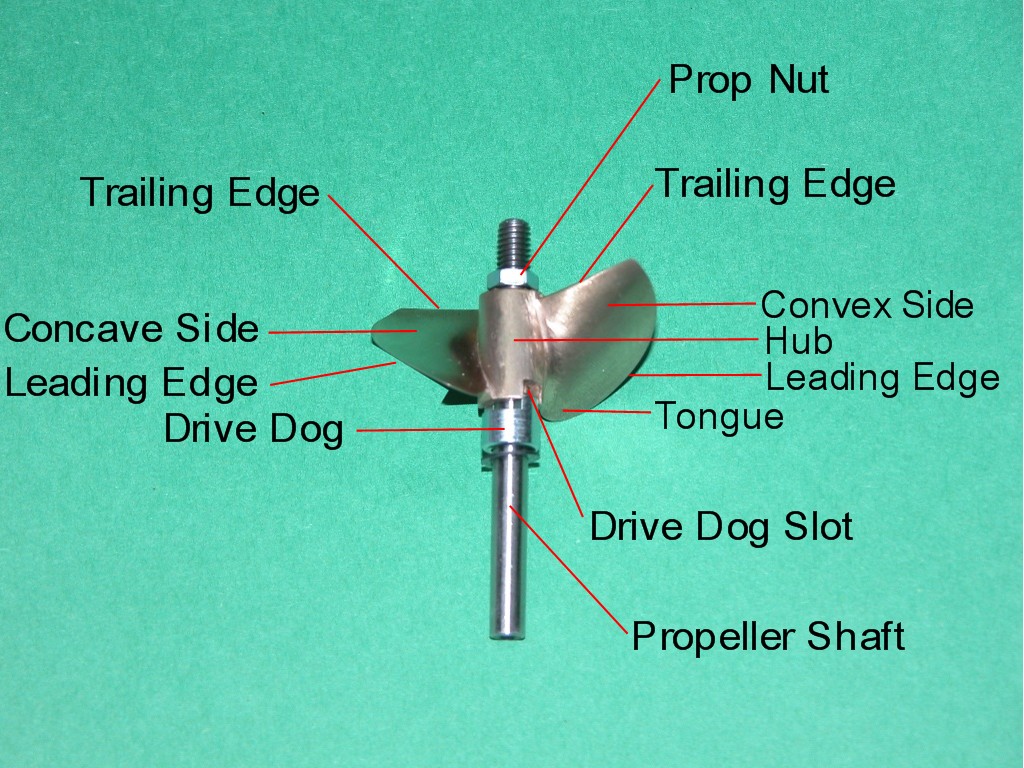
Hint, hint. No need to remove the stock stuffing tube. The mini cat hydro .098 flex with 3mm prop shaft fits great. its almost the perfect length also. The only change is the drive dog. It will drag unless the front(leading) edge is cut/sanded to a 45degreee angle.
-
Steven Vaccaro
Where Racing on a Budget is a Reality! -
"A quick temper will make a fool of you soon enough."
. . . . . . . . . . . . . . . . . . . . . . . . . . . . . . . . . . . . .Bruce Lee. . . . . . . . . . . . . . . . . . . . . . . . . . . . . . . . . . . . . . . .Comment
-
I also added the silicone water jacket. the inlet and outlet were opposite each other which wouldn't work. I had to correct that issue.
Here's the result
 "A quick temper will make a fool of you soon enough."
. . . . . . . . . . . . . . . . . . . . . . . . . . . . . . . . . . . . .Bruce Lee. . . . . . . . . . . . . . . . . . . . . . . . . . . . . . . . . . . . . . . .Comment
-
Turning the brass dog is easy with a belt sander. Just slowly rotate the drive dog while on the shaft. It took me about 1-2 minutes.Steven Vaccaro
Where Racing on a Budget is a Reality!Comment
-
LOL... me too! The way I got it done was to clamp a piece of plastic I had to the table on my drill press. Drilled a hole down into it with the 1/8" bit. Then took the bit out, turned it upside down and put it in the hole. Then put the coupler in the chuck and ran it down onto the stationary bit. Worked perfectly.I tried to hand drill out the coupler for the Ammo motor, It didn't work out.
BTW, what's the part number on that jacket?Comment
-
Part # gnd-4195
Fits 20mm to 28mm Diameter Motors. My motor is 28mm. Fits like a glove!"A quick temper will make a fool of you soon enough."
. . . . . . . . . . . . . . . . . . . . . . . . . . . . . . . . . . . . .Bruce Lee. . . . . . . . . . . . . . . . . . . . . . . . . . . . . . . . . . . . . . . .Comment
-
Hey, Diego, What prop do you think will be best with that motor? Im working on mine too.Yes its fast, yes it will go far away, yes its expensive. No you cant try it.
Comment
-
I'm such a NOOB to boats, so I really need your help guys. I finally got my Mini Rio, and I also purchased that same water jacket for motor cooling when I add the brushless. But I don't understand what you mean when you say the inlet and outlet were reversed to you fixed it. How did you fix it, or what will I need to do? Also, can you send me a link to the other parts I.E. the .098 Flex shaft? Also, where is the drive dog located?
Hang in there with me, as I said, I am a Noob, but everyone has to start somewhere.Comment
-
I'm putting it together for you now..."A quick temper will make a fool of you soon enough."
. . . . . . . . . . . . . . . . . . . . . . . . . . . . . . . . . . . . .Bruce Lee. . . . . . . . . . . . . . . . . . . . . . . . . . . . . . . . . . . . . . . .Comment
-
"A quick temper will make a fool of you soon enough."
. . . . . . . . . . . . . . . . . . . . . . . . . . . . . . . . . . . . .Bruce Lee. . . . . . . . . . . . . . . . . . . . . . . . . . . . . . . . . . . . . . . .Comment
-
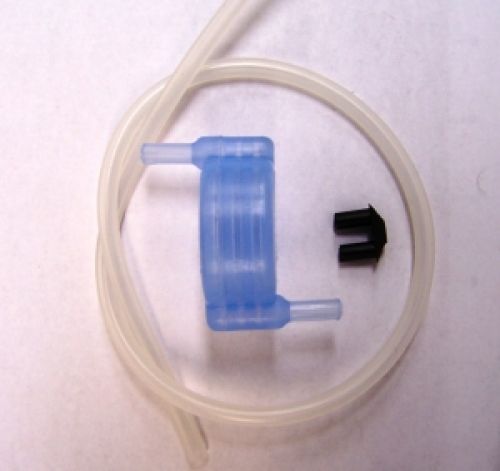
Get yourself a piece of K&S 5/32 brass tube.
Cut off one of the outlet tips on the jacket.
Drill a 3/32 hole in the opposite side of the outlet you just cut.
* The hole will close up with the bit removed, it's normal.
Insert the tube into the hole you drilled in the jacket let about 3/16 stick out the back and mark where the 2 water channels are placed on the tube with a pencil.

Drill 2 small 3/32 holes in one side where the pencil marks are.
Fill the end with solder to seal it shut.

file or sand the rough edges on the tube.
Insert the tube in the jacket positioning the holes in the water channels.

Cut the tube to length.
Done
 "A quick temper will make a fool of you soon enough."
. . . . . . . . . . . . . . . . . . . . . . . . . . . . . . . . . . . . .Bruce Lee. . . . . . . . . . . . . . . . . . . . . . . . . . . . . . . . . . . . . . . .Comment
-
Diego thanks very much for the great illustrations, and instruction. I can't believe how many parts/names for that little sucker, lol!Comment
-
Do the silicone sleeves work best though? I'd think some aluminum or copper tubing around it would be better...Comment
-
"A quick temper will make a fool of you soon enough."
. . . . . . . . . . . . . . . . . . . . . . . . . . . . . . . . . . . . .Bruce Lee. . . . . . . . . . . . . . . . . . . . . . . . . . . . . . . . . . . . . . . .Comment
-
Well truthfully the water is in direct contact with the silicone sleeving, which is in better contact with the motor... but silicone isn't a super effective thermal conductorComment


Comment